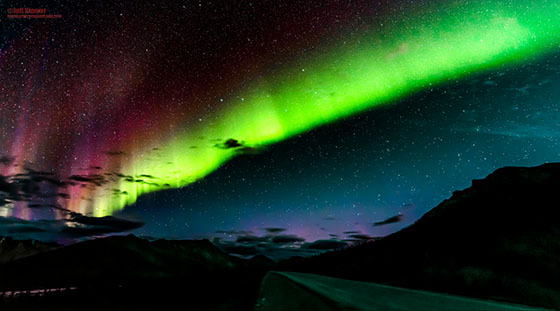
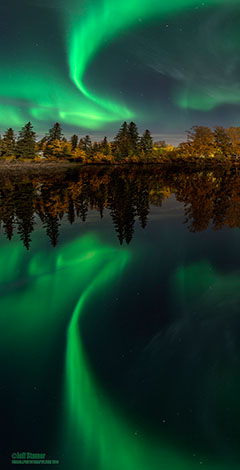
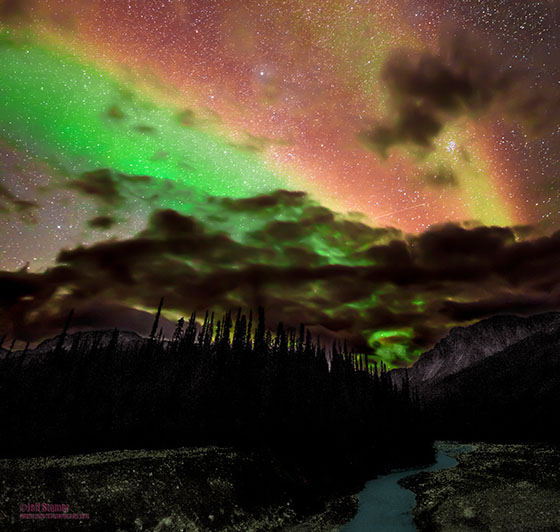
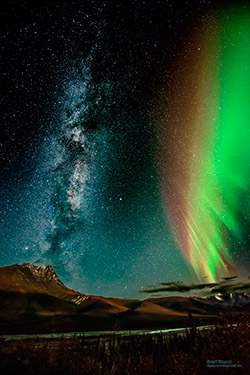
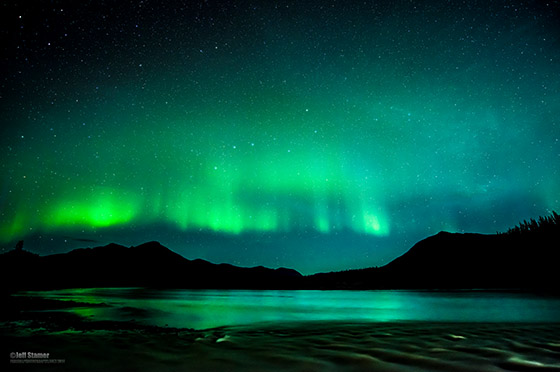
Unfortunately, they’re a sight few get to experience unless you happen to live in the far northern (or southern) parts of the globe. For the rest of us, seeing this awe-inspiring phenomena involves quite a bit of traveling and expense! If you are going to invest the time and treasure to cross this off of your bucket list, then let me help you take great Aurora photographs.
Planning Your Trip
What most folks aren’t aware of is that many of these locations are not known for clear skies (Iceland, for example, is cloudy nearly 90% of the time). To avoid cloudy skies, you can check websites that provide historical cloud coverage by month (my favorite is https://weatherspark.com/).
Personally, I think Fairbanks, Alaska is an excellent choice. Skies are clear nearly half the time in the spring (March is ideal). Unlike many of the other cities in the “Aurora Zone,” it’s a modern city with a good international airport and it’s still small enough that you don’t have to go far outside the town to avoid city lights.
When to go? The prime Aurora season runs from August to April with the equinox months of September and March being the best.
Equipment
- Camera. Your camera needs to perform well in the dark. Many newer cameras excel in low light/high ISO photography.
- Tripod & cable release. You’ll be taking long exposures so it’s critical that you have a tripod and cable shutter release to keep your camera still.
- Lens. Fast and Wide! Auroras can move across the sky at a surprisingly fast pace. To capture the details, you will be taking relatively short exposures for a nighttime scene (5-20 seconds). To gather enough light in that short of time, I’d suggest an f/2.8 (or faster) lens.
Since Auroras often stretch from horizon to horizon, it’s helpful to have a wide lens to capture the full Aurora. If you have a full frame camera, then 14mm will do the trick. Smaller APS-C sensor cameras will need something like a 10-12mm.
- Extra Batteries. The cold will drain your batteries quicker than normal. Keep a couple spares in a warm pocket.
- Warm clothes. You might be outside for hours standing in the same spot. If you are cold and miserable it will be difficult to really enjoy the spectacle and take good photos, so be sure to dress warm in layers!
Technique
- Focus. Focus on an object very far away before the sun sets. Then, turn off your auto-focus and put a couple pieces of tape on the focus ring to hold it in place. If this isn’t an option, use your manual focus and focus on the moon, a distant streetlight, or a particularly bright star. Take a shot, then review it at full magnification to see if your focus is sharp. Adjust as necessary.
- Aperture. Set your camera to Manual and select the widest aperture your lens is capable of.
- Shutter Speed. Ideally, you want an exposure in the 10-30 second range. This is short enough to capture detail in the Aurora without blurring it or resulting in ‘streaked’ stars in the background.
Take your first shot at 5 seconds and then check your histogram. If the histogram is bunched completely to the left (too dark), reset your camera to a slightly longer exposure and try again. Keep adding seconds to the exposure until you get a proper exposure (the histogram should be bunched somewhere near the center).
- ISO. A good starting place would be about ISO 500 on full frame cameras if you have moonlight and a bright Aurora but you may have to increase your ISO to over 3000 on darker nights. APS-C sensor cameras will need correspondingly higher ISO settings.
Post-Processing
- Temperature. Adjust the slider between 3000° and 4800° until you find a spot that has a nice balance between the cold blues and warm oranges.
- Exposure & Clarity. Try increasing these adjustments to make the stars more visible and crisp.
- Hue/Saturation/Luminance. Here is where you try to get your digital image to accurately reflect what you actually saw. Be careful not to over-saturate the colors or shift hues to extremes.
- Noise adjustment. Even the best of modern cameras will have some noise during night photography. The darker (foreground) parts of the image will likely have more noise than the background. Therefore, don’t apply a ‘blanket’ noise adjustment. Instead, apply the correction selectively.
This article is a very brief intro to Aurora photography. If you’d like to learn more, I have a much more detailed article available at: http://www.firefallphotography.com/secrets-tips-great-aurora-borealis-photography/
I hope you get a chance to see and photograph the Aurora—it is truly something everyone should get the chance to experience!
Get more great tips in our free weekly newsletter.

 About the Author: Jeff Stamer got his first camera, a secondhand Kodak Brownie back in 1964. A lot has certainly changed since then, but he will tell you that love of photography hasn’t been one of them. After a 30 year interlude with an international Fortune 500 corporation, Jeff returned to full-time wildlife and landscape photography in 2010. He has since been making up for those lost decades with a vengeance. Jeff writes a regular photography blog and maintains a well-respected website at: http://www.firefallphotography.com/
Leave a Reply