
Do you constantly find yourself resizing your photos to prepare them for the Internet? Maybe for posting them to a blog, emailing them to a friend, or adding them to your online photo gallery?
Surprisingly, photo resizing (or resampling) involves some very complex computer algorithms. There’s many ways to do it, and I won’t go into all the technical details here, but the bottom line is that the default resizing method in Photoshop isn’t the best one available.
If you change just one setting when resizing your photos, you can get much higher quality results that will even make your photos look sharper!
Here’s how to do it:
1.) Under the “Image” menu on top, select “Image Size…”
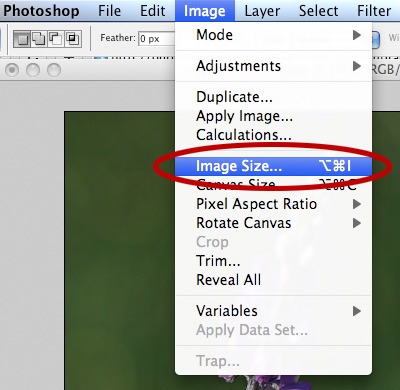
2.) This will bring up the resize window, pictured below. Notice the drop down listbox at the bottom, where the default selection is “Bicubic (best for smooth gradients).” Unfortunately, this is not always the best option.
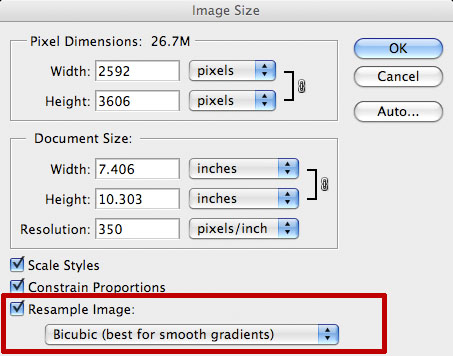
3.) From the listbox, select “Bicubic Sharper (best for reduction)” instead, and enter a new size for your image (try something around 600 pixels wide to see dramatic effects):
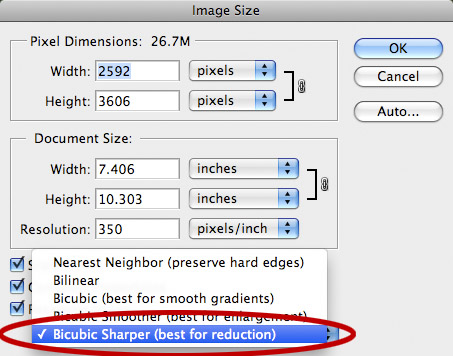
4.) Click “OK” and check out the results! Try comparing it with the standard resizing option to see how much better this method works. Here’s an example comparison:
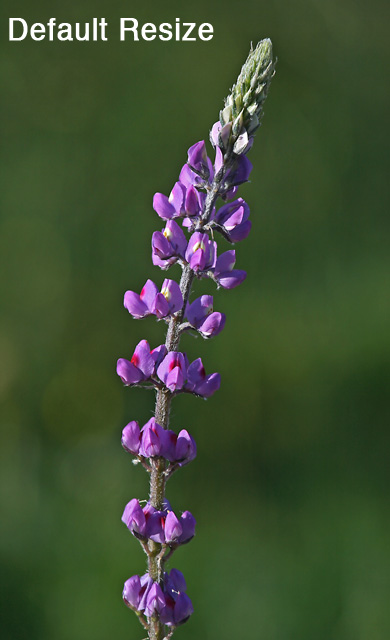
Click here to open a side-by-side comparison of the above photos.
Most of the time (but, not always), this method will produce much better results than the standard resize option. If you use this method and get a weird looking photograph (sometimes it may look “too sharp”), then go back to the default!
And, one last note: have you ever noticed how photographs on Flickr look a lot sharper than anywhere else? It’s actually because Flickr uses the best resizing algorithm, known as Lanczos resampling. For some reason this algorithm isn’t available in Photoshop.
thank god..after wondering for days,i finally got the answer to as how images look sharper in flickr.
Hi:
Thanks for the work you do putting out all the useful information on the PhotoNaturalist. It is the best I’ve seen yet and really nice to have, easy to follow.
As Annette put it, it’s a Godsend. Keep up the good work.
Steve: I love your information. I always learn some new and useful
tidbits to make my photography and Photoshopping/Lightrooming
easier and more fun. Can’t thank you enough. Frank
Steve: Your information is terrific, you can always learn from your knowledge. Keep up the good work.
Thanks a million
Marty
thanks you very much.
This is what i find.
Where is the ” Back button ” on a D700 Nikon ? Is it the AF-ON button?
Thank you.
Could you please tell me witch Photoshop do you use?
In addition, when I take photos of birs with my zoom lens Canon EF 75-300mm most of my photos are out of focus and darker……… when I zoom in to make the photo larger, I get a lot of fuzz…… please help.
Thank you, Gemma
Gemma it might help to know what you have for camera body so you can set your camera properly. Talk to someone who knows Canon cameras very well or go and talk to the people that sold the camera to you
Thanks for that. Much appreciated.
Thank you. Now I know why my photos look so awful on Flickr. I used to spend up to an hour on each one trying to make them turn out, on Flickr, the same as they look in Photoshop. I even wrote and asked, as did numerous other people, and the answer they always give is “we don’t do anything to the photos”. I gave up and no longer send photos there. This has been bugging me for 2-3 years and, at last, you’ve given me the answer. Of course, it doesn’t help with my uploads but at least I now know why!
can anyone tell me how to enable bicubic interpolation options? x.x it happens that they are inactive in my case and so i cant resize image properly
Enjoy your website, info always helpful. My question here is if this works good for resizing to smaller images , what would work better for enlarging prints?
@Paul – Thanks for your nice words! I haven’t done much enlarging, but there’s also a resize option called “Bicubic Smoother (best for enlargement)” that sometimes works better than the standard resize algorithm.
Thanks. very useful…
Thank you very much. I learn things by trial and error method, Your this article is quite useful to me….
These Tips are Great. I Like them. Thanks a Million for sharing and Guiding to get better results.
This method yielded great results for me. Thanks for the useful information.
Uuhh nice , i was looking for a good method to resize my photos and this article was so helpful. Thx !!
Hi Steve,
Thanks for the advise. I’ve just tried it on a Godwit shot and it cetaily improves it without over sharpening!
Will try some more!
Thanks Steve, I’m using XN View and it has a lot of different options for the resizing method. They are offering Lanczos as the default, so I’ll stick with that. I’m using it to resize my photos to 72dpi for my WordPress site. Not exactly the objectives of your site, but hopefully the Lanczos setting is still the best.
nice website i like it .
Truly do enjoy your very informative articles. Resizing has been a puzzle to me because I don’t know how many pixels make an inch. Perhaps this is very basic but I’ve never seen it explained. Does resizing mean that pixels are being cut out of the picture or are they compressed? I’d appreciate your input and look forward to your reply in my email follow-up comments.
Thanks for the tip, I tried a comparison using the new technique and the default one and there was a noticeable improvement.
When the Bicubic Sharper option first became available I used it frequently, but eventually decided it over sharpened my images almost every time, creating “halos” around them. I now use Unsharp Mask religiously, starting with a default of 60% “Amount,” 0.7 Radius, and a Threshold of 3 or 4. With sharpening images, less is more.
Great Tips
I just love this page and learn new things and relearn old things that I forgot!
I love your site Steve! I enjoyed this info on resizind photos sharply, but I have a question. Is there a good way to do this without having photoshop. I have an Apple and use I-photo for the most part. Are there any other sites that can compliment the Apple?
Also Steve Keep up your GR8 work. You have so much to offer other photographers. Thanks again!
Thanks, Marty! I’ve heard that The GIMP also uses this method of resizing. It’s a free program that’s available for lots of different operating systems (including Macs). Hope it helps!
Do I need to do this for each photo or will this change the default setting?
Thanks.
Thanks for such clear explanations! You have put together a great site and I’m recommending it to everyone I can think of. If you haven’t tried Sagelight yet, download a free copy and please visit it’s forum. I think you’ll be very impressed with the amount of control you have with images…