Landscapes are one of the most difficult subjects in nature photography. It’s always hard deciding what to include and what to leave out. And, it’s not easy translating a vast three dimensional space into a two dimensional photo.
Well, the next time you’re having trouble composing a landscape photograph, consider these three elements:
Foreground
The job of the foreground is to lead the viewer’s eyes into the background. This helps add a lot of depth to the image, which makes the two dimensional photo look more like it’s three dimensional.
The foreground doesn’t have to be particularly amazing (as long as the background is)–just pick something that contrasts well with the background. Any objects with leading lines that point towards the background definitely help too.
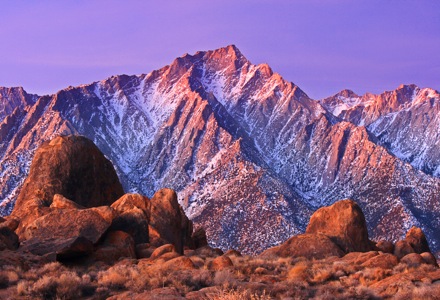
If there are any large or notable objects in the foreground (such as flowers, big rocks, trees, etc), then it might help to either put them in the center of the frame and have them expand the entire width of the frame, or put them off center (following the rule of thirds). The photo above would have looked very weird if all those large rocks in the foreground were in a big pile in the center of the image, instead of being off to the sides.
Background
Usually, the background is the most dramatic part of a landscape photograph, because it’s what the foreground leads up to. So, when the viewer’s eyes get there, it’s nice to have something powerful to look at.
Classic backgrounds include things like mountains, hills, lone trees, lakes, or great big skies with interesting cloud formations (especially at sunrise or sunset).
One simple way to make the background stronger is to photograph the landscape under strong light, which is another element of a great landscape 🙂
Strong light
If there’s one thing that can really add a lot of impact to your landscape images, then it’s strong light. By that, I mean just about any lighting conditions that produce saturated color or strong contrast.
One way to get more saturated color is to photograph your landscapes during sunrise or sunset. These are known as the “golden hours” because they produce a softly diffused light that results in colors that “pop” with saturation (the photo above was shot at sunrise). Also, keep in mind that the sunrise typically casts a cooler (blue tinted) light, and the sunset always casts a very warm (red tinted) light.
Generally, the mid-day sun produces more flat looking colors.
But, the mid-day sun shouldn’t be avoided completely. In fact, Ansel Adams created some of his most powerful images under the mid-day sun. The key to photographing landscapes under the mid-day sun is to focus on contrast of brightness instead of contrasting colors—this means the daytime is great for capturing images that you later convert to black and white. The daytime sunlight has a habit of producing harsh shadows, so it’s a great time to capture some strong contrast—the key is to think in black and white.
What did I miss?
If there’s another element you usually see in strong landscapes, please tell us about it by leaving a comment below. Thanks! 🙂
Get more great tips in our free weekly newsletter.
 About the Author: Steve Berardi is a naturalist, photographer, software engineer, and founder of PhotoNaturalist. You can usually find him hiking in the beautiful mountains and deserts of southern California.

I was so let down by my pictures of Glacier National Park. I had researched locations and ensured decent foreground but I got lazy and shot mid-day! All my pictures are boring and I just about gave up on photography.
@Francoism – don’t give up! the best way to learn is to just keep taking photos and learn from your mistakes. With digital, it’s so easy to take lots of photos now and get instant feedback. Just be persistent!
Just wanted to thank you for producing this site. The “tips” are extremely informative and concise; just the right amount of information. I have learned more and confirmed more about photography from your site than I have from books and years of learning on my own. I have also easily been able to apply the knowledge with greater “focus” on my efforts. Everything works and makes such good sense. Keep producing great things!
@Michel – You’re welcome! I’m having a lot of fun with this site, and I’m so glad people are finding the articles helpful! That was one of my goals–to make the articles concise and “to the point”, I know it’s hard to read long articles on a computer screen, so I try to make the articles here as short as possible and cover one topic at a time.
Thanks so much for your wonderful feedback!
Hi Steve, I just found your link on DPS and signed up for your updates. I am an amateur (baby boomer) photographer who loves outdoor photography. Your website (and insight) is exactly what I’ve been looking for. Thank your for taking the time to share your passion.
Hi Steve,
Love the site. Can you answer a question for me? If I shoot in RAW, can I still view in JPEG without destroying image quality? The reason I ask is I am currently deployed. I have my Canon 5D Mii which I can shoot in RAW but I have very limited access to a PC, much less Photoshop. I have a small Netbook but it won’t withstand a large program. I won’t be home on my real pc for a few more months. Thanks in advance.
Hi folks – I follow you all from a little hazy-crazy island here – Mauritius. I feel well placed to comment on one aspect of this site. You see, my first language is not English; I learnt it the hard way; grammar, sentence structures and all. This site is good because the language is SIMPLE. It is expressive and conveys the message effectively. And believe me folks, simplicity is difficult to attain. I know, because I am writing a book……in English. I’ll plunge into a few comments on my life as a DSLR beginner next time.
Tiberman Sajiwan Ramyead – Mauritius
Hi Steve
As you were are fully aware by now, I am a green D-SLR beginner. And to compound the problem my photos will be for a book I am writing. I am now re-shooting the landscapes, monuments, cemeteries, bridges, churches, etc., previously taken with compact, with my Nikon SLR. Whilst I find your tips and advice INVALUABLE, how about some guidelines on photography specifically for publication in books, please?
Thanks
Tiberman – Mauritius
Hi Steve,
I just discovered your site via DPS and am so glad I did. I’ve already enjoyed about an hour of reading and learning little extra tips. I love and do landscape photography as well as nature and wildlife. Thank you so much for your generous contribution to help, I am sure, many photographers
The best book I ever read about Landscape Photography is ‘Mountain LIght’ by Galen Rowell, there you will get most of the tips you need to know. Yes foreground, midground and background imply depth, but so do other things. For example
i) Warmer colors appear closer. The rock in the foreground appears even closer due to its warmer color
ii) Things get bluer as they get further away, a trick used by painters of eras gone. That is evident in the main photo also where the mountain is of a bluer hue than the foreground
Cheers
Gordon
Hi! Just wanted to ask how to blur the background from the photos I’ll be taking. Still new to dslr photography and just got my new toy recently. Thanks!
Hello,mr steve.tq for the tips,but i also not understand to chose with ones dslr very suitable for cretivty picture.some tell me,the models of camera does’nt the no 1 to choose camera.could help for the right tips to choose camera,i decide to use canon 600d.will you notice to me
Very simple and easy to understand method of landscape photography tips in lucid style.
Nice Article, I read the book “Mountain LIght” as well and I agree, buy it!
I know I’m on the wrong article, but there doesn’t seem to be a “search” function on this website. I’m looking for help on capturing sunrises/sunsets where the sun is the focus. I always get funny rings around the sun which ruins the shot. I’ve seen so many sunrises/sets around here lately where the sun was a perfect ball surrounded by great landscape and I just can’t get a photo I’m happy with. Are there any articles on this here? Thank you!
Hi steve
Your sute is really very helpful
Thanks alot!!!