Shooting from a photographic blind can be very useful, particularly when photographing wary animals. Although I do not routinely use a blind, there are situations where I do. Such as when shooting birds at a feeding station, or at a watering hole.
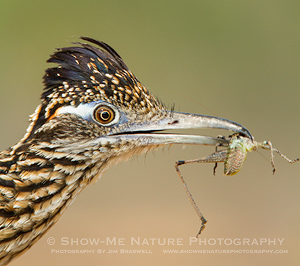
On one occasion, I was photographing songbirds at a watering hole in the south Rio Grande River Valley of Texas, when this Greater Roadrunner showed up:

Why Use a Blind?
I have found that using a photographic blind can be very useful. Photographing wary subjects is sometimes only achieved by using a blind to shield your presence. If you are not seen by the subject, you have a good chance to see and capture behaviors that you wouldn’t otherwise see. And one of the biggest advantages of using a photo blind is being able to capture closeup images.
Types of Blinds
Several types of blinds are available for use, including the permanent blind, the temporary blind, and what I call the “personal” blind. Each type has it’s advantages and disadvantages.
The Permanent Blind
The permanent blind, as its name implies, is a permanent fixture. The permanent blind is usually hardscaped, using lumber or some other type of weather-resistant building materials. If you fabricate a permanent blind on your own property, or if you get permission to place a permanent blind on someone else’s property, then a permanent blind can be invaluable. Once installed, it is there until it is dismantled, and very little upkeep is required to keep it functional.
However, one of the downsides to the permanent blind is that it cannot easily be moved, so if the animal of interest decides to move its location, then the blind will no longer be beneficial. Also, most of the time we want to use a photographic blind, it will be on public or private property, where a permanent structure is not allowed.
The Temporary Blind

The temporary blind, in my opinion, is one of the most useful. You can carry it with you and set it up, as needed. Then, when shooting has been completed, you simply take it down and carry it back out with you.
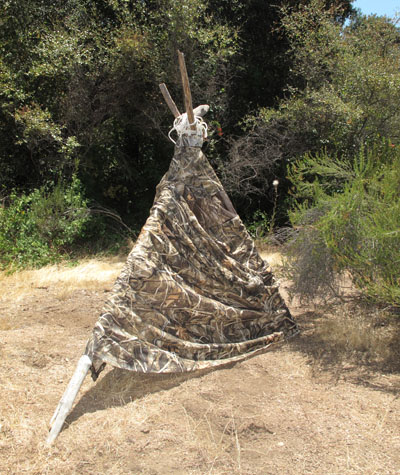
Temporary blinds can be as simple as a large piece of burlap or camouflaged material, strung between two trees, or more complex, such as a purchased, immediate set-up blind. When I use blinds, I typically use either the burlap (which I carry folded up and inside my photo backpack), or a commercial, fold-up blind that takes me all of two minutes to put up (but is a bit cumbersome to carry around).
One of the disadvantages that I have found with the temporary blind is that they are something you have to carry around with you. This might not be an issue for you, but I often find that I need more space as it is, let alone carrying around a blind. A temporary blind is usually more impacted by weather, so you will likely need to replace it periodically.
The Personal Blind
The “personal” blind is simply a large, camouflaged material that you throw over your body. A lot of people use these, and have great success with them, but I find it very uncomfortable to have something like this draped over me, particularly in the hot and humid summers we have in the Midwest. I also fear that my movements (yep, I have a hard time sitting completely still!) will frighten my subjects. But if you can get past this issue, this is a cheap and easy way to go!
Location, Location, Location
In order to get the most out of using a photographic blind, you have to follow the golden real estate rule of “Location, location, location.” If you put up a blind where the subject will not be, how are you going to capture images of it?
First, set up a trail camera where you suspect activity. Let it roll for a few days, or a week, then see if this looks like a good spot for a blind. Also, look for a location near a good food or water source. These will usually be great locations for wildlife activity. Take a hike, and look for tracks, or other signs of activity. This little bit of up-front work can save you lots of time!
Tips for Using the Blind
To get the most out of your blind, there are a few simple rules you should follow. First, get to the location and set up the blind (as needed) before the wildlife arrive. And when your are done shooting, wait in the blind until the wildlife have gone. This is a very important rule to follow, if you want the wildlife to continue using this area. A few years ago, I routinely photographed the Greater Prairie Chickens at a wonderful location on a Kansas prairie. But because of a few people arriving late to the blind, or leaving early, the chickens moved their “lek” (the springtime location where they display and choose mates) to a different area that was on someone else’s land. Since they didn’t want anyone on their property, prairie chicken photography was ceased at this location. So please don’t just think of yourself, but think of others, too!
Make the blind comfortable. You will likely spend hours at a time in it, so make it as pleasant as possible. Take bottled water with you, and use a portable chair/seat (if you have room).
And, if the wildlife is close to the blind, consider whether you should shoot a barrage of shots (known as a “burst”), or single shots. Often, wildlife is disturbed or frightened when they hear the noise of a smokin’ hot motor shooting 10 frames per second! In these cases, it may be best to shoot single shots, and waiting a few seconds between shots. This is not the ideal situation, but it beats five quick shots in a row, followed by the subject running off!
Know the Rules!
Lastly, know if there are any rules at the shooting location. Sometimes, there are posted hours for activities. Be sure to follow them! Often, locations may prohibit certain types of blinds, or prohibit using them altogether. If you’re not sure, please check with the person or organization that owns the land.
What did I miss? Do you have any tips or tricks when working with a photographic blind? Please share your thoughts with us!
Get more great tips in our free weekly newsletter.
 About the Author: Jim Braswell is a lifelong resident of Missouri, photographing nature in Missouri and beyond. His photographic passion is wildlife and wildflowers. When working with wildlife, his goal is to capture animal behaviors and actions. Besides photographing nature, Jim teaches photography and Photoshop at a local career center and participates in several art fairs/festivals every year. View more of his work on his website at: http://www.showmenaturephotography.com/

Great tips Jim, I will be shooting from a personal blind this weekend. Will used some of your suggestions.