 Note from the editor (Steve): This is a post by our newest writer: Robert Visconti. He primarily photographs wildlife (especially birds), and he’s got some really cool ideas for DIY projects and optimizing your camera gear. In this post, he talks about using flash extenders and how to make one work better.
A flash extender is just that: it extends the flash’s output to a much greater distance by using a Fresnel lens. A flash without the extender literally “floods” the entire subject area with light. The extender takes this conical shape of light and concentrates it into a beam, hence its name.
With an extender, the output of the flash is used so much more efficiently because all of the light is concentrated on the subject. That’s why you’ll usually see such reduced flash output values when examining image information (like -1 2/3 or 1/32 power). Since there’s so much more concentrated light on the subject, one has to significantly reduce the output of the flash. And, because the flash duration is radically reduced, most of the time, the internal capacitors of the flash head do not require any time to recharge so more photos can be taken without having to wait for the flash to recharge.
This all equates to much more available flash with far less need to change batteries. Please note, I certainly do not profess to fully understand flash photography…far from it. Every single time I am out in the field I learn something, whether it be about the camera’s settings, the flash head settings, or the subject itself.
Natural vs artificial light
I will be the first to tell you I prefer natural light but there are indeed plenty of times where a little artificial light can make all the difference. Don’t ever stay inside on a cloudy day! These are great days to photograph wildlife, and especially birds. A flash extender will give you that wonderful “catch light” that would otherwise not be available without the sun. The extender can also give you so much more detail in the bird’s plumage that even the sun alone cannot provide. A lot of your songbirds also prefer the shelter of wooded lots, forest preserves, etc. where natural light may not always be available to correctly expose the subject.
Tip for using the FX-4 Better Beamer
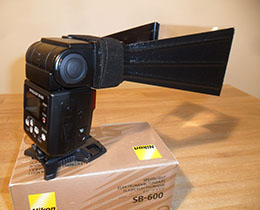
A number of years ago I purchased an FX-4 Better Beamer flash extender (for my Nikon SB-600) and I was quite anxious to see how well it worked. It’s very light and can be assembled in seconds.
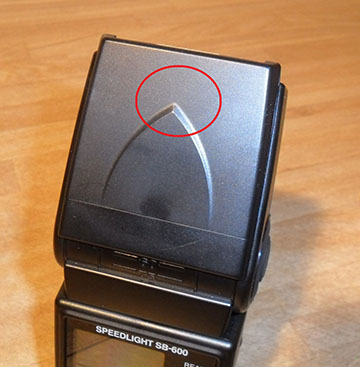
My one grievance with the FX-4 Better Beamer extender is the way the supports are secured to the flash head. A velcro band wraps around the supports and basically “hugs” the flash head. There’s a small piece of velcro provided in the extender kit to further secure the extender to the flash head (optional). The square piece of velcro would be located either on the top (see red circle in the photo below) or the bottom of the flash head. The idea is to provide some added stability in securing the extender in place.
Unfortunately, with the velcro I still found the entire assembly to wiggle a little too much for my liking. The “bend” in the support arms are to be lined up with the front edge of the flash head—a critical step in the attachment process. The reason being, so I have read, is that this establishes the proper Fresnel to Flash distance—maximizing performance. Even with the added square velcro tab, the assembly does move about the flash head and lets face it, who is going to be constantly checking it for proper orientation? I would much rather have it secured a little better so I can focus on other factors. So here is my solution! I placed a wide rubberband around the entire circumference of the flash head and then located the supports in place.
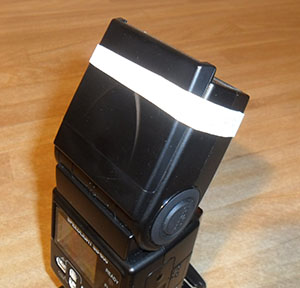
The results were pretty amazing….it did not move. In fact, the resulting friction between the supports and band are such that I can lift and hold the flash in the air by simply grabbing the supports…check it out:

I suppose any rubber band is better than nothing but basic physics dictates that a wider rubber band will yield more surface area which is the objective here. I also like the idea of not having to attach any sticky adhesive material to the flash assembly.
The band idea came to me within days of fumbling with this assembly years ago. Now every time I install it, I truly do get to forget about it.
Another advantage is that the rubber band helps keep the supports in place while the strap is wrapped around. The rubber band, of all places, was found on some asparagus at the grocery store! If you own a Better Beamer and can appreciate this issue, give it a try…..there is no time involved.
Get more great tips in our free weekly newsletter.

 About the Author: Robert Visconti resides in Lake County, IL. Robert has always had an appreciation for wildlife, even during his childhood years. In 2006, he purchased his first DSLR camera and has since then been photographing wildlife as often as time permits. He is a contributing photographer for the Lake County Forest Preserve District and has been published in a variety of magazines and catalogs. A nice collection of his work can be found on his Flickr page: https://www.flickr.com/photos/39692426@N00/
Great tip! That always bothered me as well. I hope your next article involves ways to get more interesting subjects to show up in front of the lens! 🙂
Thanks Patrick. That rubber band will lock it in place for as long as it’s assembled!
I’m going to submit a DIY flash extender bracket to Photonatuarlist in the near future. A huge cost savings from what I have seen and it works wonders for minimizing “steel eye” on birds.
Robert
I use the extender with a 300Mm lens. I ran into a Photographer who told me he burned out the sensor on a DSLR using an extender and that you should never use less that an 300mm lens with it. (He still uses a Beamer) Maybe I should set the flash for lower output when using the extender. Any thoughts on this?
I’m sure Robert has more to say on this but I’ve never heard of that happening. I have heard of extenders making burn marks on lens barrels, though. I think I read somewhere that the 300mm minimum is based on the fall of light, when using an extender, being too small for a shorter lens. Most sources tell you to set your flashes zoom to 50mm and start at -1 to -2 ev, as Robert points out above, and adjust as necessary.
@ Jim –
Never heard of this happening – I have seen issues with an external flash head itself being damaged but this was due to the extender being pointed into direct sunlight and subsequently placing excessive heat at the front of the flash unit – the Fresnel is somewhat of a magnifying lens concentrating light onto whatever is in front of it. In this case it would have been the front of the flash unit which is why the extender should never be pointed directly into the sun for any period of time.
I have always read that the extender does not make the flash travel a further distance, it merely concentrates the beam.
Concentrating the beam yields greater distance.