 Sometimes autofocus can be really annoying. For some shots it’ll focus on the right part of your subject, but then the very next shot it may choose to focus on something far and away into the background.
In a previous post, I shared a few ways to avoid problems like this, but I just found a new solution that I like a lot better: back-button autofocusing.
Here’s how it works:
Normally, your camera will auto focus when you press the shutter button halfway, but with back-button autofocusing, you have to press a button on the back of the camera instead, giving you complete control of when autofocus is initiated.
How is this helpful? Well, for landscapes, now you can just set the autofocus point to the center spot, then point that at an object a third of the way into a scene, press the back button to automatically focus on that object and finally release. Now for all the shots you take, that focus will be maintained (the camera won’t randomly focus into the background anymore).
You can do the same thing without this back-button autofocusing by switching to manual focus after the camera focuses properly, but using the back button saves time and this way you don’t have to constantly switch back and forth between manual and auto focus (which can inadvertently move the camera sometimes).
After talking with my dad, I learned that back-button focusing is also helpful for photographing birds in flight or other wildlife: just switch on AI-Servo mode, set the autofocus point to the center spot, and hold down that back button. Now you don’t have to worry about accidentally hitting the shutter button while you’re tracking the bird in your viewfinder.
How to setup back-button autofocusing
On some cameras, this feature may be enabled by default, but on others you might have to do some digging around in your camera’s custom functions (accessed through the configuration menus). Each camera manufacturer seems to call this feature something different, so look carefully!
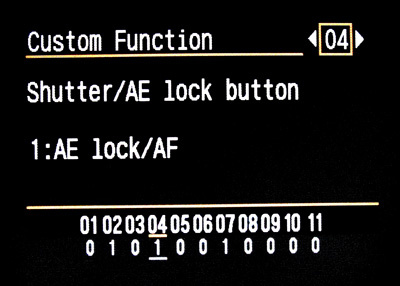
On my Canon XTi, I just went to the custom functions screen, and set the “Shutter/AE lock button” to “1: AE lock/AF” … Here’s a photo I took of the screen:


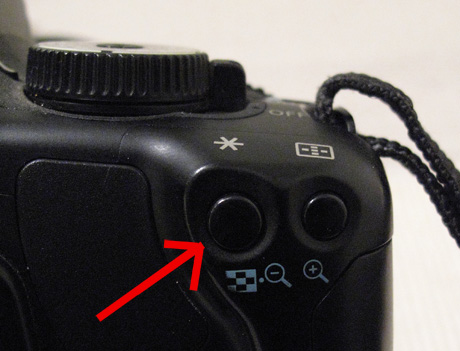
The actual button you’ll use once the feature is enabled, also varies from camera to camera, but on my XTi, it’s a button in the upper right corner of the camera (see photo above).
Get more great tips in our free weekly newsletter
 About the Author: Steve Berardi is a naturalist, photographer, computer scientist, and founder of PhotoNaturalist. You can usually find him hiking in the San Gabriel Mountains or the Mojave Desert, both located in the beautiful state of California.
This is wonderful information that I really, really need. I can see where I will be spending some time. I like the way you present your info as it is easy to understand. Some of the materials that I have picked up for my canon are too involved or not clearly presented. Thank you… Michelle
On a D300 it’s custom setting menu option a5 — AF Activation — AF-On Only.
As with your XTi this disables the half shutter button auto focus, and only the AF-On button (next to the rear selector wheel) will engage the autofocus. By default both are enabled on the D300.
Steve, great advice and I agree fully! Started using it and reduced softness (out of focus) or front and back focus by 90%. Should be standard on all cameras.
Does get challenging when you want to do this AND AE-lock. Of course that’s where the manual focus switch comes in handy. Good tip though.
When my boyfriend gave me the first DSLR, this option was enabled on it. And it really helps in almost every situation: from landscapes, portraits to macro. But somehow my friends do not like this then I borrow them my camera for a while.
Steve, how do you go about locking the exposure when you back-buton focus? I guess if you shoot on manual it is fine, but gets a bit tricky if (like me) you shoot with Av a lot.
Hi Steve,
I don’t have a 7D but it might be my next camera, although I’d like the 5D Mark II, it is too heavy for me and too expensive. I am older and a small frame woman.
Anyway, what I have found and love, in my “old” 20D is the exposure lock which I use all the time, it is the same button than the autofocus in your 7D. I use it as much as bracketing.
And I always carry my manual (still small), and try to convince some friends that life in photography is a lot easier, more fun and rewarding if you know your camera, and of course some photography, rather than take unending number of shots to hopefully get a good one. And I have not scratched the surface yet. Did not mean to get carried away.
Thanks for your lessons, I love and treasure them