To get these faster shutter speeds without sacrificing your desired depth of field, your only option is to use higher ISOs (making your camera’s sensor more sensitive).
Unfortunately, at these higher ISOs, sometimes you get some really ugly noise in the background.
Well, there just happens to be a great way to reduce this noise in Photoshop. Here’s how:
1. Duplicate your primary photo layer by selecting the layer in the Layers window, and then going to the “Layer” menu at the top of the screen and select “Duplicate Layer” (you can rename the duplicate layer if you want, but otherwise just hit “OK” after that).
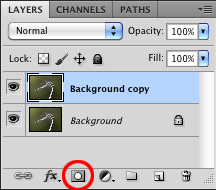
2. Add a layer mask to the duplicate layer by clicking the “Add Layer Mask” button in the Layers window:

3. Draw an outline around your subject with the lasso tool. You want to get close, but not too close, because then you’ll lose sharpness on the edges of your subject. Here’s an example of how close you should get:

4. Fill your selection with black by going to the Edit menu and selecting “Fill…” and then under the “use” drop-down list select “Color…” and choose pure black (red=0, green=0, blue=0). Now, with this part of the layer mask filled in with black, any changes you make to the layer will only show up on the background of your subject.
5. Clear your selection by going to the “Select” menu and clicking “Deselect”
6. Blur the edges of your layer mask by going to the “Filter” menu and selecting “Blur” and finally “Gaussian Blur” — usually a radius of around 40 pixels works well.
7. Select the raster part of your layer in the Layers window:

8. Apply a median filter by going to the “Filter” menu and then under the “Noise” menu, select “Median” — usually a radius between 10 and 20 pixels works well.
That’s it, you’re done!
If you notice a thick layer of noise around your subject, then you can try blurring your layer mask some more, outline your subject with the lasso more closely, or go in with a paintbrush tool and paint white just outside the edges of your subject (make sure you select the layer mask before you start painting!).
Also, note that this method only works well for close-up photos where you have an out-of-focus background. And, it works best when the background is mostly one color.
Do you have another method for removing noise?
If you’ve discovered another method for removing noise in the background of close-up photos, please tell us about it by leaving a comment below. Or better yet, contact me about writing a guest post about your method 🙂 Thanks!
If you enjoyed this article, and would like to read more, please signup for free updates by email or RSS.
 About the Author: Steve Berardi is a naturalist, photographer, software engineer, and founder of PhotoNaturalist. You can usually find him hiking in the beautiful mountains and deserts of southern California.

I wish I’d seen this yesterday! Since mine was an indoor still life minimal despeckling combined with adding artistic textures did the trick for me, but this would have given me a much better starting point. (I’d share the image but it’s a commissioned piece so it’s still under wraps for now.)
Steve, am I missing something (or perhaps my version of PS 5.1 is different)? I tried this a couple of times and for it to work I have to manually deselect the marquee before applying the median filter to the raster layer.
Bill – Good catch, I forgot to mention deselecting everything after you mask out your subject. I just added another step, thanks for pointing that out! 🙂
I’ve come up with a ‘quick and dirty’ variant of your method that doesn’t include duplicating the layer or masking. I’ve used it with success; YMMV.
Create your initial selection around the subject similar to, or closer than, shown above, but on the main layer. Invert the selection. You’ve now selected the background.
Feather the selection. 10 px works well for photos sized for online display; you may need to increase the feather amount for larger images. This corresponds to blurring the mask, above.
Apply the Median Filter as above and deselect the marquee. If you like the result you are done. If too much or too little area is affected, undo the filter and feather in your HIstory panel and adjust the selection using the “+” or “-” functions of the lasso tool.
For me, it is easier to modify the selection than manipulate a mask. I believe your final PSD file will be somewhat smaller, too. The virtue of Steve’s method is that you can come back to your image later and still adjust the mask. In either case, never change your original image files; always work on a copy.
Great idea, Bill! And, you’re right, without that duplicate layer, the file size will be a lot smaller.
I do the following very regularly for a background similar to your example:
– Use the Magic Wand Selection Tool to select the background.
– Use Select/Modify/Contract by about 5 pixels. This will give the ring around the image similar to the lasso.
– Use Filter/Noise/Despeckle on this selected area (background)
– Use Filter/Blur on this selected area
– Use Select/Modify/Contract by 5 pixels again. This will separate the selected area from the subject a bit more.
– Do a more aggressive gaussian blur.
This might fall under the category of “down and dirty”, but it avoids having to use layers, which to me is an advantage.
Great tip Steve, thanks. I normally use a well known noise reduction programme but that doesn’t always work. I’ll give this a go. Thanks again
Hi Steve,
I use Nik Software Dfine 2.0 Noise Reduction as one of my Lightroom plugins.
Nik software has patented “U point technology” which allows you to add control points for detailed adjustments.
This yields the same results, actually better in most cases, as when I used to do layer adjustments in Photoshop for noise reduction.
Most important … Dfine 2.0 takes me less than 50% of the time to reduce noise, compared to when I adjust in layers using Photoshop 🙂
Happy Holidays to all!
Paolo
Smoky Cat Productions
Jacksonville, FL
Nature & Wildlife
Photography & Videography