 One of the first things you probably want to know after taking a photo is whether or not you got your intended exposure.
You might be tempted to look at the preview on your LCD screen, but when you’re shooting photos outdoors in the sun, those previews can be very deceiving, making your photos look much brighter than they actually are.
So, how do you know if you got the right exposure? Well, one way is to use the histogram.
What is the histogram?
If the word “histogram” brings back bad memories of boring lectures in math class, don’t worry: the histogram is pretty simple.
It basically just shows the distribution of light and dark pixels in your image.
Here’s an example, with each axis labeled:
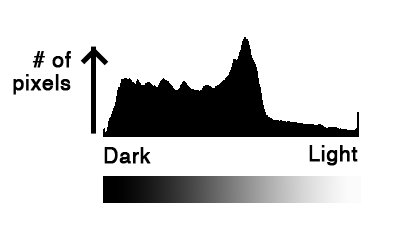
The left side of the graph shows how many dark pixels you have in your image, while the right side of the graph shows how many light pixels you have in your image. So, in this example, the image mostly has dark to midtone pixels.
At first you may think that every image should have a balanced (i.e. bell curve) histogram, but this doesn’t always happen. It really depends on your image. For example, the histogram of a snow-covered landscape will mostly consist of bright pixels, so it’ll carry most of its weight on the right side of the histogram.
How to use the histogram
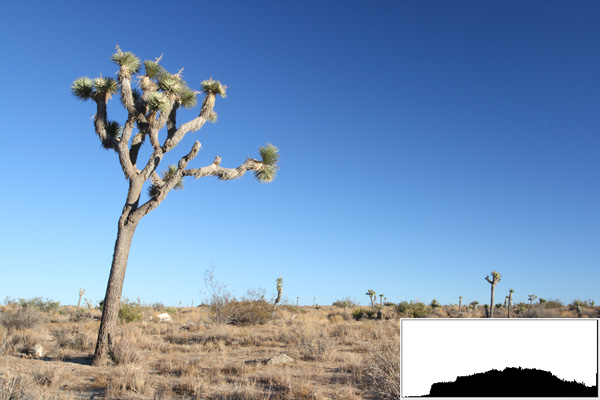
The histogram is best explained with a bunch of example photos, so here’s an unedited shot (along with its histogram) I took this past weekend, using auto exposure:
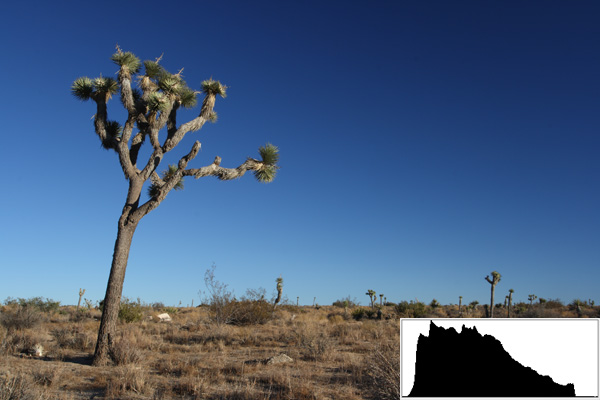
When I shot this photo, the exposure looked fine on my LCD preview, but because I was outside in the bright sun, the preview looked much brighter than it actually was. And, the histogram proves this: all the pixels are dark to midtoned. And, since I knew the scene was actually pretty bright with the sun shining on all those desert plants, I knew the photo was underexposed.
The first shot was exposed at 1/20 sec, so I stopped down half a stop to 1/15, and here’s the result:
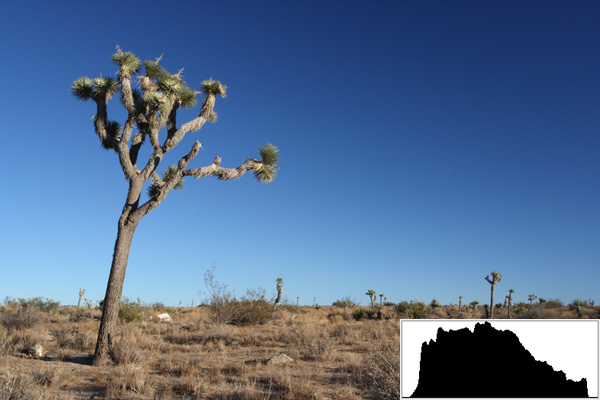
Notice how the histogram is now more spread out, and moved closer to the right? This is because of the longer exposure. There’s still a little gap there on the right side, so I tried a slightly longer exposure of 1/13:
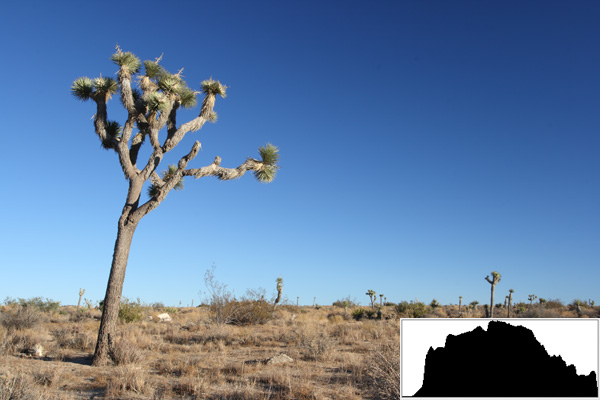
With this photo, the histogram is even more spread out, and has a bigger gap on the left, meaning there aren’t many dark pixels in the image. Look at the right hand side though: there are a few pixels on the verge of being overexposed (pure white).
A good rule of thumb is to get the histogram as close to the right as possible, without actually touching the right side.. but, this doesn’t always work!
After seeing the histogram of this photo out in the field, I thought this would be the perfect exposure, but I took one more shot just to be sure (at 1/10 sec):
It’s a little hard to see in this histogram, but there’s a black line going all the way to the top on the far right. That means the image has overexposed (white) pixels. If you look at the rest of the histogram and notice how it looks very compressed, you’ll realize that quite a few pixels are being overexposed.
So, the winning photo is the third one! It does still look a little underexposed to me, so I’d probably adjust the levels slightly in Photoshop as well.
How to enable the histogram on your camera
On most cameras, all you have to do to see the histogram is change the “view” on your image review screen (on my Canon XTi, I just hit the “display” button). If that doesn’t work, try looking through your camera’s menus or as a last resort just google your camera with “histogram”
Turn on highlight warnings to make your job easier!
Sometimes it’s hard to spot those blown out highlights on the histogram, but luckily there’s something that’ll make your life much easier: they’re known as highlight warnings. With these enabled, the blown highlights will “blink” on your image review screen, making it clear where you’re overexposing the shot.
They’re enabled by default on some cameras, but if they’re not on your camera, just do some more looking in your camera’s menus, try hitting the “info” or “display” button on the back, or as a last resort there’s always google.
Things to remember about the histogram
- The histogram shows you the distribution of light and dark pixels in your image
- Consider how bright the scene is, before you decide on the proper histogram
- A properly exposed image will not always have a balanced histogram
- Turn on highlight warnings to help you spot blown highlights
Stay tuned for a post on the RGB histogram!
Since the standard histogram combines all the color channels (red, green, and blue), it’s not always helpful in determining the proper exposure. Most cameras also have an option to see the histogram separately for each color channel: one for red, one for green, and one for blue. These are especially useful for photographing wildflowers.
Get more great tips in our free weekly newsletter
 About the Author: Steve Berardi is a naturalist, photographer, computer scientist, and founder of PhotoNaturalist. You can usually find him hiking in the San Gabriel Mountains or the Mojave Desert, both located in the beautiful state of California.

excellent explanation
there is a trick and it is over expose the images in RAW mode (more amount to the right in the histogram with let’s say 2 steps up), if you use a high ISO value, to let via Adobe Camera RAW or another RAW processing software, correct that overexposure with high ISO, so you can reduce the noise on the image, lowering exposition via software and letting you use a high ISO value with post processing
Thanks for writing such easily accessible explanations. You make things that seem complicated feel simple.
“A properly exposed image will not always have a balanced histogram”
Could you please give us more insight and clear definition then when you mention this detail.
Wisely the LCD screen on camera is so small, that it si very hard to revel an accurate result of the final picture. Some LCD screen display enhanced as well different brightness correction according to environment.
Are you recommending to shoot at different exposures or speeds according to the histogram indications of the camera in order to obtain in general an over-exposed source image in order to be able later on, with software, to make post-production corrections?
Hey, great to find another photonaturalist!
–new subscriber
@oliloli – Properly exposed images will not always have a balanced histogram because the image may naturally consist mostly of light or dark pixels.
A good example of a naturally bright image would be a snow covered landscape (and it would be even brighter if the sky was cloudy).
A good example of a naturally dark image would be a waterfall on an overcast day. The histogram at the top of this post was actually taken from an image like this.
Hope that clears it up! Let me know if it doesn’t!
Steve
Great article Steve! I finally read it and I am excited about the things you’re doing. I do agree with publikaccion (see above comment) but I have never read a better article about histogram exposure. I look forward to more articles from you.
Darryl of Lancaster
Thank you, I finally understood what the histogram is for. I have a lot of work to do now.
Thanks
Very nice, easy to digest description on how to use a histogram to achieve best exposure. Thank you.
When I take a shot, I make quickly sure that none of my pixels is crawling up either side, touching either of the sides of the histogram. Works pretty well for me as I am often on the go and moving to and fro different lighting situations.
Great article thanks alot
This is the best histogram explanation I ever read for a beginner like me. The transition from underexposed to overexposed is well-explained thru sample photos with it’s corresponding histogram. Thanks Steve!!!
I attended a class with Art Morris who is a Canon-sponsored photographer. He asked the techinical people if it would be possible to have a setting (similar to AV) that would make the photo as bright as possible without overexposing anything. They said that it would be fairly easy to do, but that they didn’t think anyone would want it. I expose the way you mention above and I would kill for that kind of feature.
Steve – I’ve been wanting that same feature too! We even have the technology to do it on a pixel-by-pixel basis, which would give you even more power in capturing a good exposure. If anything, I’d just love to have the ability to program the camera myself maybe someday Canon or Nikon will make a camera like that…