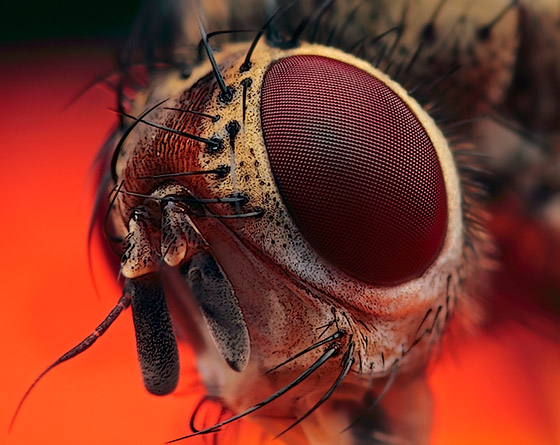
This is a guest post by Huub de Waard, an exceptional photographer who specializes in close-up shots of insects. After reading his post, be sure to check out more of his awesome photos at his website. And, if you’re also interested in writing a guest post here on PhotoNaturalist, please contact me, thanks! –Steve
One of the most popular books that I read during my childhood was Eric in the Land of the Insects, written by the Dutch author Godfried Bomans. In this humorous fantasy, nine-year-old Eric enters the landscape painting that hangs on his wall and he discovers a world of man-sized wasps, bees, butterflies and other insects that is stunningly similar to the world of humans. Once photography became a part of my life and I purchased the Canon extreme macro lens MP-E 65 mm f/2.8, which has combined with a 2x teleconverter a maximum magnification of 10:1, my world was populated with grasshoppers, spiders, snails, flies, dragonflies and butterflies—Eric’s world.
Magnification describes the relationship between the actual size of the subject and the size of its image on the sensor of the camera. Photographing a 3 cm (1.18 inch) long blue-tailed damselfly so that its image size is 1 cm (0.39 inch) on the sensor means that the magnification is 1/3 (1:3) life-size. Dividing the size of the subject’s image on the sensor by the actual size determines the magnification. At 1:1 life-size, the size of the subject on the sensor is as big as it is in real life. Macrophotography is restricted to magnifications in the order of 1:10 to 1:1 life-size. Microphotography is the extreme form of macrophotography, dedicated to the photography of small objects from life-size to modest enlargements of up to about 20.
Larger than life-size

A low-budget method to decrease the minimum focusing distance is to extend the distance between the lens and the sensor by inserting extension tubes or a continuously adjustable bellows. Both the extension tubes and the bellows do not contain optical elements. The further the lens is from the sensor, the closer the minimum focusing distance, the greater the magnification, and the darker the image given the same aperture. Tubes of various lengths can be stacked, decreasing lens-to-subject distance and increasing magnification. Extension tubes and bellows can be used for different lenses. A small disadvantage is that the use of extension tubes and bellows may not preserve autofocusing, auto exposure and auto aperture operation.
The maximally obtainable magnification can be calculated with the following simple equation:
(D(length of the set of extension tubes or the bellows) + F (focal length of the macro lens)) / F = magnification.
For Example: Adding a set of extension tubes with a total length of 60mm to a 60mm macro lens will give maximally a magnification of (60+60) / 60 = 2.
By adding a teleconverter, an even greater magnification can be achieved. Application of a 2x teleconverter produces a maximum magnification of 4 and 2 stops loss in light intensity. Adding more glass means a drop in quality and quantity of light transmission, the extent of which depends on the quality of the particular teleconverter you’re using.
Placing an auxiliary close-up lens (or close-up “filter”) in front of a macro lens is another option. Inexpensive screw-in or slip-on attachments provide close-focusing at a very low cost. Some two-element versions are qualitatively very good while many inexpensive single element lenses exhibit chromatic aberration and reduced sharpness of the resulting image. When you use macro lenses with different diameters, for each macro lens a close-up lens has to be purchased separately. Most close-up lenses are marked with a +d number in diopter unit, the power of the lens. The diopter (or power) of a lens is defined as 1000 / Fd, where Fd is the focal length of the lens measured in mm. Thus, a lens with a focal length of 50mm has a diopter of +20 = 1000 / 50, and a +4 diopter close-up lens has a focal length of 250mm = 1000 / 4.
The maximally obtainable magnification can be calculated with the equation(2F + Fd) / Fd.
For Example:coupling a +20 diopter lens with a 60mm macro lens produces maximally a magnification of (2*60 + 50) / 50 = 3.4.
An interesting alternative is the reverse lens technique which can be accomplished by mounting a lens with focal length Fr in reverse, in front of a normally mounted lens of greater focal length F, using a macro coupler which screws into the front filter threads of both lenses. The maximally obtainable magnification can be calculated with the equation F / Fr. Depending on the quality of the reversed mounted lens, a drop in quality and quantity of light transmission may negatively influence the image quality. All discussed techniques can be used in conjunction to obtain even larger magnifications.
Next week, we’ll publish part II of this series on insect micro photography, where Huub discusses how to approach insects without scaring them away. Make sure you don’t miss it by signing up for our free weekly newsletter.
About the Author: Huub de Waard is a Dutch wildlife photographer who specializes in insect macro photography. He photographs very small invertebrates so close-up that they are transformed into large subjects. Through his images, he aims to highlight the different characteristics of a variety of species—and their individual charm. His specialty is called microphotography, which is the extreme form of macrophotography, dedicated to the photography of small objects from life-size to modest enlargements of up to about 20. He does not apply focus stacking and all of his pictures are single images made in his own garden. His work can be found at http://www.huubdewaardmacros.com/
I’ve only just joined “photonaturalist”, and one of my first actions was to read the article by Huub de Waard in respect of his “Part 1 – Introduction to Insect Macro Photography”. I’ve tried to find “Part 2”, but have not yet succeeded. I consider myself to be an all-round photographer, and presently lead the “Nature Group” at my local club in England. I have dabbled with Macro (and Micro) photography, and I do agree that it’s challenging – by which I mainly mean acquiring suitable subjects when shooting out and about. I am aware that at significant levels of magnification (M), the depth of field can become tiny (being a function of M, f/- & the pupil ratio). One can use small apertures, which usually brings the need for artificial lighting but, at significant ‘M’, this doesn’t really help all that much. One can use ‘focus-stacking’ (which I do), but doing this in the field with a live subject I find close to impossible – because of movement (wind, and / or insect movement). I’d appreciate any advice available on how to get reasonable depths of field, when using large levels of magnification with live subjects (which move), and when out in mother nature (where the wind blows) – if you have any available. Many thanks in anticipation.
Hi Kevin,
You can find all three articles at
https://photonaturalist.com/author/hwaard/
Regards,
Huub