With film photography, filters were pretty important (especially for black and white images). And although they play a much smaller role in digital photography, there’s still a few filters you should be familiar with. So, here’s a brief introduction to some of them:
Polarizing Filter

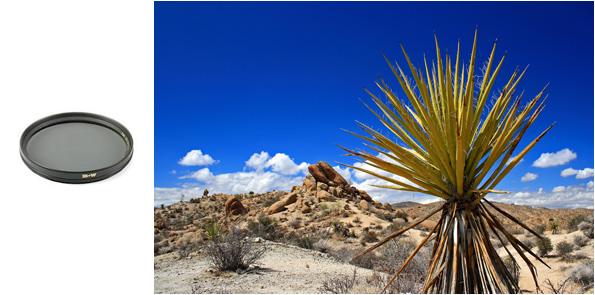
Simply put, the polarizing filter helps reduce unwanted reflections. It can be used to deepen the blue of the sky like in the photo above. And, it’s also extremely helpful in reducing or eliminating reflections on water, rocks, or other objects. It’s a filter that every landscape photographer should carry at all times.
For the strongest effect, you want to use the polarizing filter when your camera is pointed at a 90 degree angle from the sun. You can certainly use it at other angles, but the effect will quickly diminish as you move farther from that 90 degree angle.
Neutral Density (ND) Filter

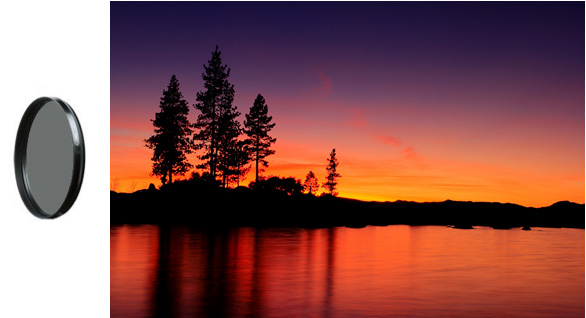
The neutral density (ND) filter is basically a dark piece of glass that reduces the intensity of the light entering your lens. They’re useful for when you need a slower shutter speed, like if you’re trying to make water in a scene look silky or smooth as in the photo above of Lake Tahoe.
Neutral density filters come in a variety of different strengths: everything from 1-stop to an intense 10-stop (that you can barely see through!). Personally, I’ve found the 2-stop and 10-stop most useful.
Graduated Neutral Density (GND) Filter

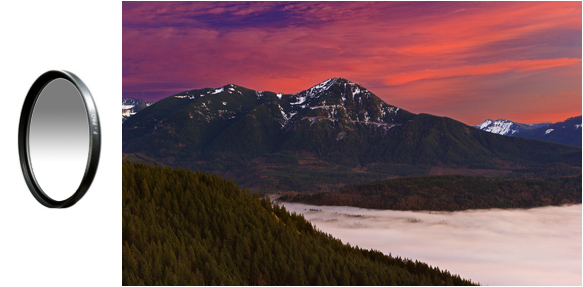
The graduated neutral density filter is similar to the standard ND filter, but instead of a uniform neutral density, the filter transitions from dark to clear. This makes it useful for photographing scenes that are extremely bright in one area and dark in the rest of the image. The classic example is a sunset: the sky is super bright, but the foreground is in the shade.
Alternatively, you can avoid GND filters by taking two exposures of a scene and then merging them later in post-processing. This gives you complete control with how the two exposures blend together (rather than the standard straight line you find in GND filters). Personally, this is the method I prefer (it’s what I did for the image above).
Ultraviolet (UV) Filter

The ultraviolet (UV) filter blocks UV light, which can create a bluish tint in your images. They’re also often used to protect the front element of your lens, and many people keep a UV filter on each of their lenses at all times.
Why you should use multicoated filters
When buying filters, itʼs important to get the good quality multicoated ones because these significantly reduce the amount of reflections off the filter (and any reflected light wonʼt hit your cameraʼs sensor, resulting in a more washed out image). Will you notice a huge difference in image quality just by using multi-coated filters? Probably not, but this is just another one of those little things that when combined with other little things will give you a noticeably better image.
Stay tuned for more details on filters!
Some of the filters I discussed here (like the polarizing filter) have a lot of different applications, so I plan to discuss each filter in more detail in future posts. To ensure you don’t miss those posts, please sign up for free updates if you haven’t already 🙂
 About the Author: Steve Berardi is a naturalist, photographer, computer scientist, and founder of PhotoNaturalist. You can usually find him hiking in the beautiful mountains and deserts of Southern California.
Thanks Steve….I knew you’d get around to it sooner or later ! I was mostly getting confused trying to buy an ND filter….but you cleared that right up for me !!!!
Thanks Steve, good introduction to filters. Looking forward to more info on using other filters.
Hi Steve – about the neutral density filters: but you may lower the speed on manual exposure and still obtain the silky or smooth water surface. I know such filters do have the effect of adding something to the shot which a bare lens cannot produce. What exactly is that something, please?
I know I must buy one ASAP; I was taking an important personal shot of a lake only today, facing the setting sun and I had a nasty time with the reflections.
Tiberman
@Pete – Sorry it took me so long! I appreciate your patience 🙂 I started writing this post multiple times over the last few months, but it kept turning into a book–I was trying to explain too much about each filter.. so, I finally decided to just do a simple intro first and cover the details in later posts.
@Roln – thanks! One that I didn’t mention here is the IR filter, which can be very useful for cutting through haze (e.g. distant mountain landscapes). I’m looking forward to writing about it in the future.
@Tiberman – Although you can use a slower shutter speed instead of an ND filter, that would risk underexposure. You could also use a smaller aperture, but sometimes even the smallest available aperture on your lens may not allow you a slow enough shutter for what you need. The ND filter gives you more freedom, basically.
Great article Steve!! But, I don’t know how you do it! I just bought/received my first polarizing lens from Amazon and thought, “Ok…now let’s see what we do with this!” and then I opened up your email! Too funny!! Thanks as always! Peg
Thanks, Peggy! I must be getting better at reading minds, heheh 😉