When photographing nature, there are many times when a photographic filter on the end of the lens can help improve the image, or give the image a different effect. Such is the case when I captured Maroon Creek (Colorado) with a Neutral Density filter:
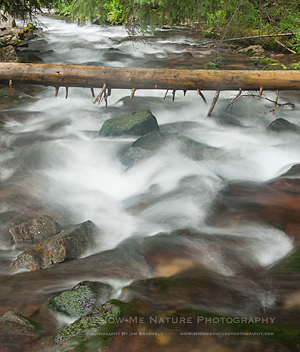
Kind of like “creativity in a can.” What filters are most useful for shooting nature?
Polarizing Filter
The polarizing filter is one of the most common filters that nature photographers use. It works by removing glare and reflections from the scene.
A polarizing filter is useful for:
- Saturating a blue sky and enhancing clouds
- Removing reflections from glass, water, or metal
- Saturating colors in the landscape, especially in shaded woodlands
- Helping to cut through haze

When using a polarizer, it works best when the reflection/glare is coming in at a 90-degree angle to the lens. So, if it doesn’t appear to be working well, try moving around a bit. Also, for anyone that has never used a polarizer, you need to compose the image, then rotate the polarizer until the image (as seen through the viewfinder) is at its darkest point; this will be the maximum point of removal of reflected light. Personally, I like to vary the amount of polarization in an image by first rotating to the darkest point, then backing off just a bit. To me, this gives a better and more natural looking sky.
Neutral Density Filter
The Neutral Density filter is a solid, dark filter, much like a pair of sunglasses (but not polarized). It is used to reduce the amount of light that enters the camera.
A neutral density filter is useful any time you need to block light out of the composition, and is especially useful for shooting running water and waterfalls. Because of the reduced light, the shutter speeds are slower, giving the moving water that often sought after ethereal or dreamy look.
Split Neutral Density Filter
The Split Neutral Density Filter is simply a Neutral Density Filter that is opaque on one half and clear on the other half. When used in a composition, the clear area of the filter will not impede light from entering the camera, but the dark portion will “hold back” the light (the amount depends on the strength of the filter being used).
These filters are great for narrowing the range of tones in an image. For example, if you are shooting a landscape where the top of the composition is a snow-covered mountain, and the bottom of the image is a cabin in the shade, the range of tones is too much for the camera to accurately capture the entire scene. Either the snow will be blown out (when you expose for the shady area), or the shady area will be too dark (when you expose for the snowy area).
Using the graduated filter, with the dark half covering the snowy area, and the clear portion over the shady area, you can shrink down the range of tones. Split Neutral Density filters come in a variety of strengths, as well as either “hard” or “soft.” This refers to the gradation from clear to dark; the hard gradation goes immediately from clear to dark, while the soft fades from clear to dark.
One important issue with using a round Split Neutral Density filter on the end of a lens, is that you are very limited with your composition. With the gradations of the filter, you must compose so that the light areas are covered by the dark portion (and, ditto for the dark areas). If Split Neutral Density filters are used, I prefer the square or rectangle filter (that I mention, below).
UV Filter
A UV filter is designed to reduce the haze caused by ultraviolet light in the atmosphere. My experience is that they don’t make a lot of difference in the resulting image, at least not enough for me to use them. But they are very useful for protecting the lens from things like small scratches, sea salt spray, and blowing dust or sand.
I used to use these on all my lenses, all the time, primarily for protection from any damage that could be caused by my clumsiness. But I really don’t like using them because a filter is another layer of glass that the light must pass through and each passing of light through glass can degrade the image a bit (although, honestly most of us probably couldn’t see the difference). So I now only use them when I’m shooting on the beach, from a boat on the ocean, or when dust/sand is blowing around. Otherwise, I remove them from my lens.
Filter Qualities
Filters have a few characteristics you need to be familiar with. First, many filters diminish the amount of light that enters the camera, thus losing precious light that we photographers never seem to have enough of! Always check the information that comes with the filter, or go to the manufacturer’s website and find out how much light you lose by using a specific filter. For example, using a polarizing filter usually causes a loss of 2 stops of light. To compensate for this light loss, you will either need to shoot at a slower shutter speed, use a larger aperture setting, or set the ISO to 2 stops faster.
Filters come in various sizes and you must get one that will fit your lens size (the size is stamped into the end of the lens, or check the lens manual). To get around buying lots of filters, there are two options available.
First, you can buy and use filter adapters (also called “step-up” rings) and utilize one filter size for multiple-sized lenses. To do this, you MUST buy the filter to fit the LARGEST lens size you have, then buy adapters that will convert the large filter to a smaller lens. For example, if you have a 77mm lens (filter size) and a 72mm lens (filter size), buy a 77mm filter, and then an adapter that adapts from 77mm to 72mm. If you go the other way (i.e., adapt a 72mm filter to a 77mm lens), you will end up with a blackening around the lens’ outer area, a phenomenon called “vignetting”. I’ve been using this method for a short while and the only complaint I have is that using a filter and the adapter will sometimes not allow you to mount the lens hood onto the end of the lens. Either that, or you first put on the lens hood, then the adapter/filter; but now, you cannot easily get your fingers inside the lens hood to take the filter off!
Another way around having multiple filters is to purchase a “square or rectangle” filter kit (I use the Cokin “P” kit, but other manufacturers also offer a similar kit). The filter is large enough for all sizes of lenses and slides into a holder that you adapt to the different sized lenses.
Filter Care
Filters are either glass or plastic. Either type can be scratched or broken if mishandled. When not in use, always store the filter in a protective device, either the case you purchased it in, or a filter wallet, made for storing multiple filters. You never want to store filters, one on top of another. If you need to clean a filter, use a high quality lens cleaner and soft, cotton cloth or lens paper.
What did I miss? Do you have any special filters that you use, that I haven’t covered? Please let us know!
Get more great tips in our free weekly newsletter.

 About the Author: Jim Braswell is a lifelong resident of Missouri, photographing nature in Missouri and beyond. His photographic passion is wildlife and wildflowers. When working with wildlife, his goal is to capture animal behaviors and actions. Besides photographing nature, Jim teaches photography and Photoshop at a local career center and participates in several art fairs/festivals every year. View more of his work on his website at: http://www.showmenaturephotography.com/
Leave a Reply