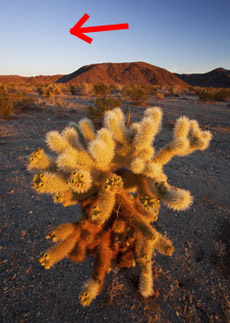
It happens because the polarizer works better on some parts of the sky than others. And, since you’re capturing such a wide part of the sky with a wide-angle lens, you’re almost always going to run into this problem.
Sure, you could avoid this problem all together by not using a polarizer on a wide-angle lens, but then you wouldn’t be able to take advantage of the other great benefits of the polarizer: reducing unwanted reflections, and saturating colors.
So, what should you do? Well, fortunately there’s a pretty easy fix using the burn tool in Photoshop:
- Open your image in Photoshop
- Duplicate the background layer by clicking on the layer in the layer window and then go to the “Layer” menu on top and select “Duplicate Layer…” (Duplicating the layer is helpful so you don’t have to worry about messing up your original image)
- Select the “Burn” tool in the toolbar (see picture on right, it looks like a hand making the shape of an “o”).
- Set the size to about the height of the sky
- Set the hardness to about 30%
- Set the range to “midtones” (this works well on the sky), and exposure to about 30%.
- Hold down the left mouse button and draw over the washed out area, being careful not to overlap your strokes.
- Draw over the area again to make it even darker, and adjust any of the values as needed (to make the burn stronger, try increasing the “exposure” percentage).

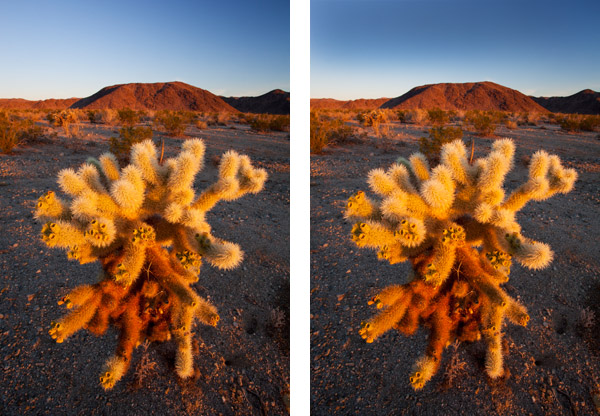
Here’s a side by side comparison of before and after photos:

If you enjoyed this article, and would like to read more, please signup for free updates by email or RSS.
 About the Author: Steve Berardi is a naturalist, photographer, computer scientist, and founder of PhotoNaturalist. You can usually find him hiking in the beautiful mountains and deserts of Southern California.
Two months ago I discovered a wonderful book, “Photoshop Elements 8”, “the missing manual”. It’s expensive $45.00, join Borders and wait for a coupon. I got 50% off. I’ve been using photoshop for many years, I’ve learned more since getting this book, than the 8 years I’ve tried to learn on my own. I’m 64 years old and having fun!
Here’s another suggestion. Using Adobe Lightroom, select the gradient tool and drag it across from left to right. The neat thing is you can adjust the amount of ‘exposure’ or ‘brightness’ or ‘clarity’, etc. and all adjustments are applied in a gradual fashion across the gradient filter you have created. I often use it to even out a non-uniformly illuminated scene, but it would also work for the polarizer-induced ‘washout’ you wrote about. I enjoy your tips. keep them coming.
@visualstoryteller – Thanks for the Lightroom suggestion! I’ve never worked with LR, but I keep hearing great things about it and how it’s easier to do a lot of PS stuff in there, so I’ll have to check it out! Oh, and glad you’re enjoying the posts here 🙂
@visualstoryteller – I like the tools in LR very much and work every day with them, but in this case I wouldn’t use the gradient tool in LR because you would darken not only the left side of the sky, you would darken the left side of the whole picture and there is no way to mask parts of a gradient away in LR.
At least none that I know of. 😉
Karsten
I just discovered your website and I really enjoy your articles. They are short, to-the-point and well written. I particularly like the way you provide Step-by-Step instructions to show us how to implement your tips. Keep ’em coming!
@James – Thanks so much for your nice comment! My original goal with this site was to write about nature photography in a clear and simple way, so it’s always great to hear nice words like yours. The posts will definitely be coming for a long time 🙂
I love the shot of the teddy bear cholla
Hi all,
In addition to Photoshop & Lightroom, if any of you uses Google’s Picasa, a washed out sky can be fixed by the using the “graduated tint” effect in Google’s Picasa. Its under the effects tab. Enjoy!!!
Great tutorial thanks. I’m about to go and take photos of a classic car show so these tips are going to help as I don’t have a polarizing filter for my wide angle lens yet.