 Last week, I talked about the different phases of developing creativity. I mentioned that in the final phase, you start visualizing images that are not a part of your collection yet.
But, once you start getting all these great ideas for images, how do you keep track of them all? Well, here are a few things that have worked for me:
Carry a pen and notebook everywhere
Once you start visualizing images, you’re likely to think of photo ideas at the most random moments. You might be in the middle of chowing down some tasty fish tacos, and all of a sudden you think of a great idea for photographing your favorite mountain peak.
When these inspirations occur, it’s important to quickly get your ideas down on paper before you forget them. So, it’s helpful to always carry around a pen and some paper (or a small notebook, like a Moleskine). Try to write down every detail you can think of, and it helps to draw a little sketch of the composition too (like the one above). The sketch doesn’t have to be perfect–it just needs to show the general composition with notes or arrows that point out details.
Upload your notes to Evernote
Evernote is a useful web app that helps you keep track of all your notes. I’ve been a passionate user of the service for a couple years now. If you start finding yourself buried in a mess of paper notes, then Evernote might be able to help. One of my favorite things to use it for is to take photos of handwritten notes or sketches with my iPhone, and then upload those images to Evernote. This is extremely simple to do with Evernote’s iPhone app (they also have apps for just about any device).
There’s a free and paid version of Evernote, but the free version will work just fine if you’re just going to use it for organizing your photo ideas. The paid version only makes sense if you start uploading a ton of images or start scanning documents and want faster character recognition.
Mark your locations on a Google Map
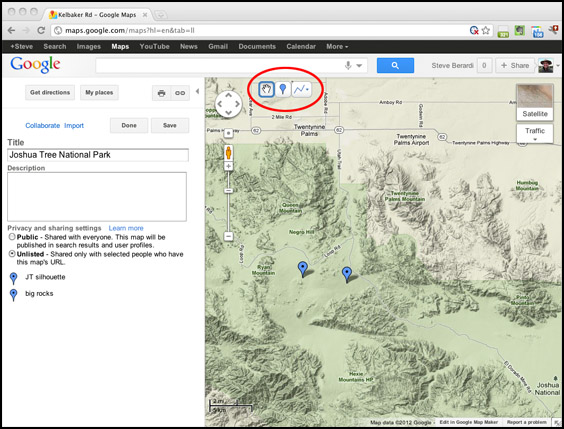
For landscape images, you can create a custom Google map and mark spots where you think a good image can be made.
For example, let’s say you’re hiking on this trail and you think of a great idea for a photo of a distant mountain peak. But, then when you look up some sunrise/sunset info on the Photographer’s Ephemeris, you realize it’s the wrong time of the year for that wonderful sunset light to illuminate that mountain peak. So, when you get home that evening, you can mark the spot on a Google map and write a note about the best time of year to shoot a photo at that spot.
To create a custom Google map, just create a Google account, sign in, and click on the “Maps” link at the top of the page. Then, click on “my places,” and finally you click on “Create Map” to create a custom map. Now, you can start adding points by clicking that blue bubble in the upper left corner of the map:

Also, be sure to mark your map as “unlisted” on the left, so other people can’t find your map.
What did I miss?
Have you found another great way to keep track of all your ideas for photographs? If so, please tell us about it by leaving a comment below! 🙂
If you enjoyed this article, and would like to read more, please signup for free updates by email or RSS.
 About the Author: Steve Berardi is a naturalist, photographer, software engineer, and founder of PhotoNaturalist. You can usually find him hiking in the beautiful mountains and deserts of southern California.

I’ve used many of these same tools over the years to build up a library of possible photo locations. More detailed notes and the history of the place (if historical in nature) go in Evernote along with screen grabs of both the Google maps satellite view and Bing maps birds eye view view. Then I have a separate Google MyMaps map for each type of subject genre that I typically shoot. I have ones for Covered Bridges, ones for old Grist Mills, ones for Waterfalls, ones for old and interesting barns and ones for historic one-room schoolhouses.
This used to all work very well because I would build smaller Google MyMaps Maps for each trip I would be making that included the stops I wanted to shoot in the area from all my other maps. Then my Android phone would have access to that map and give me voice turn by turn directions during the trip. It made finding the locations easy. But a couple of weeks ago I dropped that phone and it broke into what seemed a million pieces. Long story short, I switched to an iPhone 4S but quickly discovered that the access to voice turn by turn directions based on my Google MyMaps map was no longer available under IOS. Has anybody found a solution to this shortfall on IOS ? I put a lot of time into developing those maps over the years and would really hate to lose that part of my shooting workflow.
nice tips. i shall be trying a few of them….
Great ideas Steve. I just started using Evernote and love it! And of course Photographers Ephemeris is invaluable for planning shoots.