 One of the common goals of a landscape photograph is to show depth—either to show the viewer how vast a landscape is or to help lead the viewer’s eye from the foreground into the background.
You might think that adding depth is as simple as using a wide angle lens, but it’s a little more subtle than that.
Here are a few ways to show depth in a landscape photo:
1. Focus on elements that lead the viewer’s eye
The general thing to remember with capturing depth in a landscape is to focus on elements that naturally lead the viewer’s eyes through all dimensions of the landscape. This could be things like a fallen tree that points towards the back of the frame and leads the eye to the base of a mountain, or a stream that serves a similar purpose.
When you lead the viewer’s eye through the frame like this, it makes the viewer feel like they’re traveling through the image—which translates to a feeling of depth.
For example, in the image above, there’s a natural path that starts wide in the bottom of the frame, and gets narrower as it moves back in the frame. This helps give depth to the image.
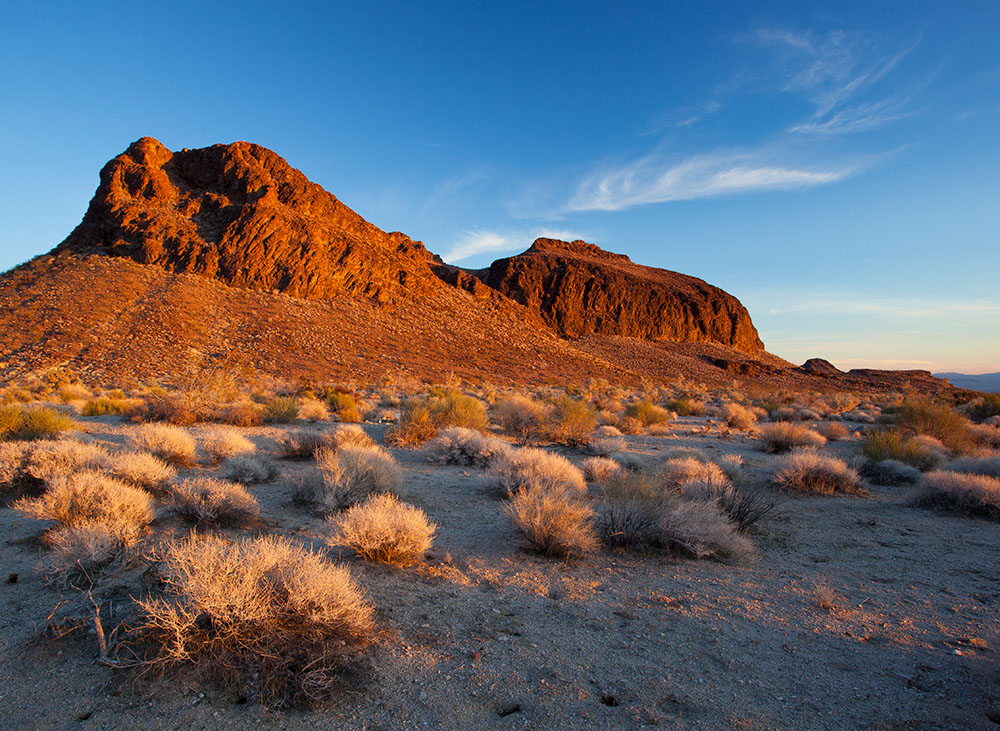
2. Get above the landscape
One of the simplest ways to add depth to a landscape is to get above it. Look around for big rocks you can stand on or see if there’s a short hill nearby (please be careful not to disturb any plants though). Or, if you’re photographing a landscape from the road, you can do what Ansel Adams did: just get on top of your car!
Getting above the landscape helps give you a wider view of what’s below. Think about the difference between seeing a city while standing on the street vs seeing it from the top floor of a skyscraper. Neither view is necessarily “better” than the other, but the view from up high in the skyscraper would show more vastness to the city.

In order to show the wide open space of the Mojave Desert in the photo above, I shot the photo from a small hill — I was about 4-5 ft above the landscape.
3. Photograph your subject from an angle
If your image focuses around a single large feature, like an interesting rock formation or canyon, then one thing you can do to show depth is photograph it from the side at an angle.
For example, compare these two images of one of my favorite canyons in the Mojave Desert:
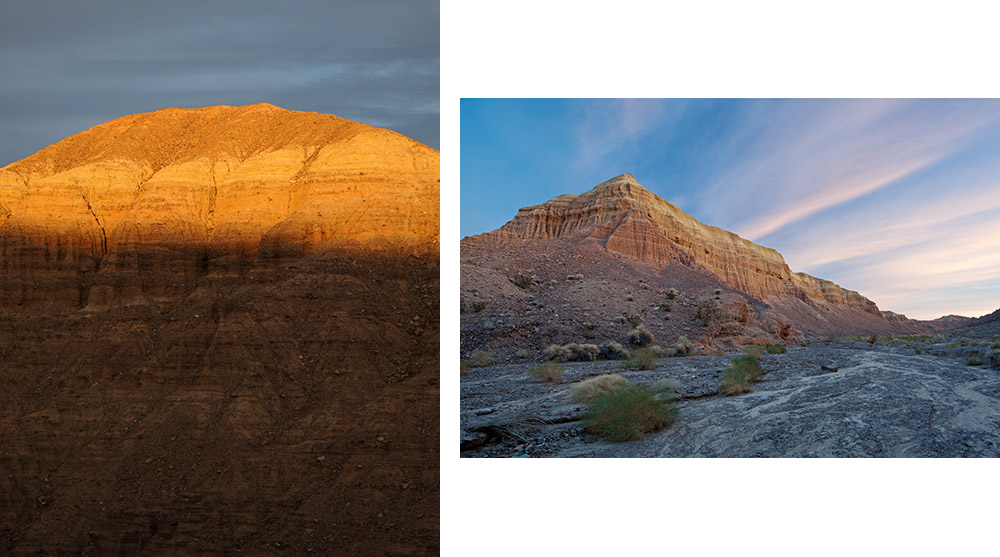
The first image is a direct shot of the canyon walls — my camera’s sensor for this image was parallel to the wall of the canyon. In the second image, I switched to a wide angle lens and looked down the canyon at an angle — this helps show depth because as the canyon walls get farther in the background, they also get smaller.
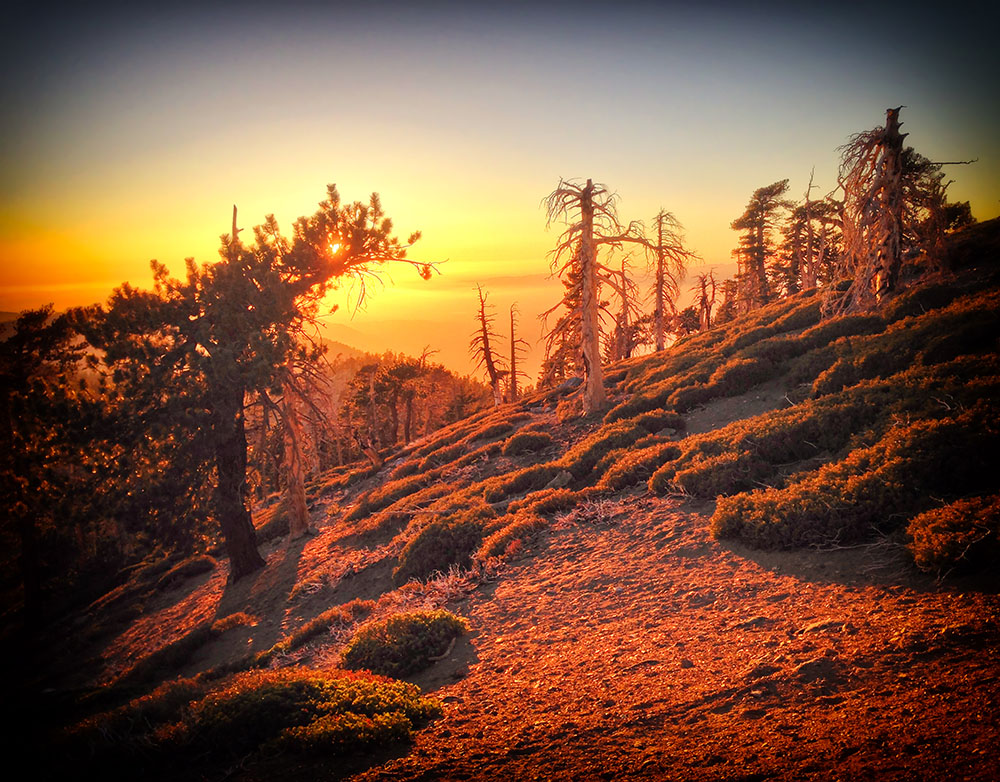
4. Include lots of near, mid and far objects
Depth is another word for deep, so in order to show depth, you want to capture a lot of space. One simple rule of thumb to do this is to make sure you include a variety of near, mid and far objects.
This works even better if you have similar objects at different distances, because the human eye knows these objects are the same but sees them getting smaller as they move back in the frame and that makes the viewer process the scene as three dimensional. Like in this photo:
If instead you just have near and far objects, the image will have less depth because the viewer will have less space to look and travel through. It’ll seem like there’s a sudden “jump” in the image from near to far.
These are just guidelines, you don’t always need depth
It’s important to remember that you don’t always need depth in a landscape image. Sometimes that might not be the message you’re trying to send with a photograph — and that’s ok! Personally, I photograph a lot of distant landscapes with telephoto lenses, and these naturally show very little depth (not a bad thing at all).
But, in those cases where you DO want to show depth and communicate to the viewer how vast and open a space is, then consider some of the ideas listed above. You don’t need to include them all, just use what works for your vision.
What did I miss?
Do you have another way of showing depth in a landscape image? If so, please share it with us by leaving a comment below. Thanks!
Get more great tips in our free weekly newsletter
 About the Author: Steve Berardi is a nature photographer, software engineer, and founder of PhotoNaturalist. You can usually find him hiking in the beautiful mountains and deserts of southern California.
Glad you’re back…thanks for the article.
Gald to hear that you are back in action Steve. I missed reading your articles. I know what it’s like to get overwhelmed with the writing. I’ve been on a one-year hiatus myself.
I will let all of my friends and followers know that Photo Naturalist is back on the map.
Yeah! Welcome back! Inhave always enjoyed your blog–and this doesn’t disappoint!
Hi Steve,
I am glad that you are back. I have been following your and your dad’s articles, which are very interesting, and educational. I missed them very much. I am looking forward to read more articles, but this as long as you have the time to do it. Thank you very much. Have a nice day.
Jan Khoe
Nice to have you back, Steve. I’ve missed your great tips the last couple of years.
Your desert shots are awesome. Do you ever capture the Milky Way in the desert? I would be interested in knowing more about how you get those dramatic photos of the night sky.
Hi Del,
We published an article by Jeff Stamer a few years ago, about photographing the Milky Way:
https://photonaturalist.com/4-steps-photographing-milky-way/
There’s some good tips in there, but I’ll probably be writing more about it too later this year once it cools down in the desert 🙂
Yay, i forgot i was following you and reminded why i am, awesome photos!!!! yeah, no burn out.
Thanks Steve, I have just got back from a trip to Canada and Alaska and was thinking seriously about packing my camera gear away for a while as my pictures are very disappointing p, to me. But just reading your article has given me some hope. So I will now look for someone who can point me in the right direction. I have owned my DSLR for six years now and never really learnt how to use it to its fullest.
Cheers for that.
Don’t give up, Tony! Photography can be frustrating sometimes when your photos don’t come out as you expected, but it can also be rewarding when they do 🙂 just keep trying and learning, and focus on your successes. For every “good” photo I take, there’s usually at least 4 bad ones that didn’t turn out well — and even those “bad photos” are valuable learning experiences because I always go over them and try to explain to myself why the photo failed, which helps improve my vision for future photos.
Welcome back!
Great tips. Glad you are back ????????
Welcome back, Steve! I am so happy to know that my favorite mentor is back from hiatus! This article is so timely for me! Putting your advice to practical application. I’ve just upgraded some gear – my first full-frame (5DMarkIV) and I’m anxious to explore the new possibilities! Yes! I am stoked buddy!
Great post. Nice to hear from you again. I totally get it about life taking over aspirations. Persistence is key!
We’ve missed you. Glad to see you back!
Great info many thanks
Thanks everyone for your kind and welcoming comments! It’s very good to be back 🙂
Welcome Back, Steve!
Your tips are so helpful and easy to understand. I love your images. Your respect for nature comes out in your work. I live in Southern Oregon where there are many opportunities for depth of field and your tips have helped me often to capture it the best way possible.
You have been missed.
Wendy
Glad to see you’re back again! I enjoy your posts a lot!
Good to hear from you again, looking forward to reading your articles
Ditto, ditto, ditto. Enjoy your perspective. Thanks for being the Guy.
So pleased you are back again. This article is a prime example of the quality work you do–from both the photography and the writing perspectives.
Missed u, ur articles & photos. Welcome back????????
Welcome back! Thanks for the article!