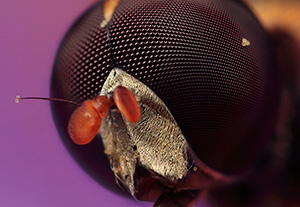
Composition is more difficult for microphotography than for other types of nature photography.
Your subject might be an insect or a spider sitting on a difficult-to-reach place. Add the fact that you need to approach very carefully to not disturb your subject and you have a bit of a tricky situation. There are no golden rules to help you solve this one. Play around with composition until you get something that works.
In microphotography, you want to simplify your image as much as you possibly can. Fill up as much of your frame as possible with the subject. Have your focus as sharp as possible and don’t be afraid to experiment with different angles to find the one with the most aesthetic appeal. Photos at high magnification have a corresponding shallow depth of field, so precise control over the location of focus is critical. This requires not only artistic decisions about what part of the subject should be tack sharp, but also technical decisions about how to make the most of this sharpness.
Fortunately, the location of sharpest focus appears much more pronounced in the viewfinder when the subject is under high magnification. However, just because it’s easy to see doesn’t necessarily mean that it’s also easy to position. Even small errors in a camera’s autofocus can be disastrous for an image. This should only be used as a rough guide; precise adjustments should almost always be done using manual focus. It’s almost a universal rule that the subject’s eye(s) should be the location of sharpest focus and should have a well-chosen position within your composition. For maximum sharpness, adjust the angle of your camera so that the plane of sharpest focus aligns with the head/plane of your subject. If you’re off by a fraction of a degree, the complete subject disappears from view.
In microphotography, the background is often so out of focus that it appears as a solid or smoothly varying patch of color. It’s important to choose a background which complements the color and tone of your foreground subject. Fortunately, you can often pick a different background by simply shifting the camera’s vantage point. You should also take care to avoid placing distracting out of focus highlights or other objects behind the subject.
Focusing

As magnification increases, depth of field decreases rapidly. Due to loss of light and depth of field considerations, it’s helpful to use a ring flash or twin lite flash when shooting micros. It will allow you to shoot at a reasonable speed, yet enable you to use a small aperture for sufficient depth of field and a fast shutter speed (e.g. 1/200sec) to capture moving insects. Magnifying the image also magnifies any movement of the camera and the subject, so it becomes far more challenging to make super sharp images.
Because I am hand-holding a relatively heavy and bulky setup, it is not possible to focus using the lens focusing ring, which also determines the magnification. Rather, I pre-set the focusing ring based on how much magnification I want. Once the focus is set, I will physically move the lens, mounted on the camera body, back and forth until the facets in the compound eye(s) of my subject are in perfect focus in the viewfinder. This is the tricky part, obviously, as a fraction of a millimeter can significantly affect the focus. For instance, at five times life-size the depth of field of the MP-E 65 mm at f/16 is 0.269 mm. For higher magnifications, the situation is even worse. In order to stabilize the whole setup, I’ll rest my elbow on my knee or both elbows on the ground. As soon as I see perfect focus, I’ll press the shutter button to take a photo.
We hope you enjoyed this great series by Huub de Waard! We’re looking forward to featuring more guest writers in the future 🙂
Get more great tips in our free weekly newsletter.
About the Author: Huub de Waard is a Dutch wildlife photographer who specializes in insect macro photography. He photographs very small invertebrates so close-up that they are transformed into large subjects. Through his images, he aims to highlight the different characteristics of a variety of species—and their individual charm. His specialty is called microphotography, which is the extreme form of macrophotography, dedicated to the photography of small objects from life-size to modest enlargements of up to about 20. He does not apply focus stacking and all of his pictures are single images made in his own garden. His work can be found at http://www.huubdewaardmacros.com/
Leave a Reply