So, here’s a brief introduction to IR photography and its effects:
Benefits and Effects of IR Photography
So, what’s so special about IR photography? Well, it produces some interesting effects, which you might be looking for in one of your images:
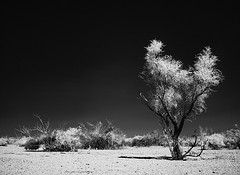
- Creates dark skies. One of the things IR photography is best known for is producing very dark skies. When you convert your IR image to black and white, the sky will usually be completely black—which is great for images where you want to highlight a bright object against a dark sky, or you want a dark sky to make the landscape appear more intimidating or powerful.
- Makes plants bright white. Any plants (such as trees, bushes, flowers, etc) in your IR image will show up very bright (usually white) after you convert it to black and white. This effect works really well with the dark sky effect, because it helps create strong contrast between the sky and plants—making the plants really stand out in your image.
- Eliminates haze. One of the lesser known effects of IR photography is that it helps eliminate haze. Have you ever tried photographing distant mountains or a long canyon and ended up with a bunch of washed out images? It’s usually because of haze—the farther you get from a mountain, the more haze will become a problem. Sometimes this haze adds an interesting element to an image, but if you’re looking to get rid of it, then IR photography might be worth a try.
How to get started
The simplest way to get started with IR photography is to purchase an IR filter for your lenses. This is a special kind of filter that blocks out all visible light and only lets infrared light into your camera.
You’ll notice that there’s lots of different types of IR filters, which are usually marked with a range like 800-2000nm. This range refers to the wavelengths of light that the filter will allow to pass through. For reference, the human eye can see wavelengths ranging from 390-700nm. I’d recommend starting with a filter that begins somewhere between 700nm and 800nm—these actually let in a very small amount of visible light, which helps keep your exposure times down.
Since the IR filter blocks most of the visible light, and since your camera blocks most of the IR light, there’s actually very little light that makes it to your camera’s sensor when you have an IR filter on your lens. So, you’ll need much longer exposures than normal (usually around 20 seconds at f/11 in the mid-day sun).
With these longer exposures, you’ll definitely need to use a tripod to keep your camera steady. If the longer exposures create problems (e.g. if it’s really windy and the plants end up blurry in your image), then you can try increasing your ISO speed to get a shorter exposure.
Once you capture a photo with an IR filter, you’ll notice that the image has a red tint. Don’t worry, this is normal! Later in post-processing, simply convert the image to black and white.
Example: Smoke Tree

Personally, I love to use IR photography to photograph plants in the desert. I feel like the dark skies really help portray the harshness of the desert environment, and the bright white vegetation helps make those fascinating desert plants stand out.
For example, one of my favorite plants of the Sonoran Desert is the Smoke Tree. This tree got its name because it actually looks a lot like smoke. And, to emphasize how much it looks like smoke, I thought it’d be good to create some black and white images of them—particularly with IR. The image above shows a bright Smoke Tree in front of a dark sky.
What did I miss?
If you’ve experimented with IR photography, and have found another interesting effect or benefit, then please tell us about it by leaving a comment below. Thanks! 🙂
Get more great tips in our free weekly newsletter.
 About the Author: Steve Berardi is a naturalist, photographer, software engineer, and founder of PhotoNaturalist. You can usually find him hiking in the beautiful mountains and deserts of southern California.

Hi Steve,
I found your article on Infrared photography from 2013 and have to take exception to some of your comments. First, I started out shooting MF IR film in 2007. I then converted a Nikon D70 to a 720nm IR camera in 2008. I later updated the camera to a D300, so I have been shooting IR for 10 years now. First exception, an IR converted DSLR does not always produce dark skies, especially at the lower wave lengths (720 or less) due to the amount of moisture (humidity) in the air – see your Junegloom article, as I too live in So Cal. Second, plants need direct IR illumination to be bright and white (best time of day is between 10am and 2pm, contrary to full spectrum photography). There is an effect due to photosynthesis (Wood’s effect) that contributes to the brightness of the collage, but is not a large contributor overall. You will notice that any viable plant material in the shade is – in the shade and not bright. And third, IR photography will only eliminate haze if there is a big source of IR light (the sun). Even then, if there is a lot of moisture in the atmosphere, it will still look gray. These notes are based on my experience and are my opinion. I am not an expert or professional photographer.
Hi Dave,
Thanks a lot for your comment. I think you’re right about everything you said, it all makes sense. I’ll have to do some more research, and write a follow-up article to clarify some of these details 🙂
Thanks again!
Steve