 Yeah, yeah, I know–you should always use a tripod. But, unfortunately this isn’t always possible. Sometimes you need to travel light, and leave your tripod behind. Or, other times you may be going to a place where they don’t even allow tripods.
So, what do you do without a tripod? How can you possibly get sharp photos without one?
Well, one thing you can do is improvise with the objects around you. The tripod is meant to stabilize your camera and prevent it from shaking, so anything you can rest the camera on will also work (just not as well). Try looking for large rocks, or tree branches, or anything else you can rest your camera on while shooting the photo.
For example, when I took a trip to the island of Nuku Hiva, there were some strict weight restrictions on the flights, so I wanted to travel as light as possible. That meant leaving my tripod and SLR at home. I went with just a Canon G10 (a point and shoot camera that also has full manual controls).
Although the camera has Image Stabilization built into the lens, I knew that my hands seem to shake a lot when hand-holding the camera, so whenever I took a photo on the trip, I always looked for a way to help me stabilize the camera.
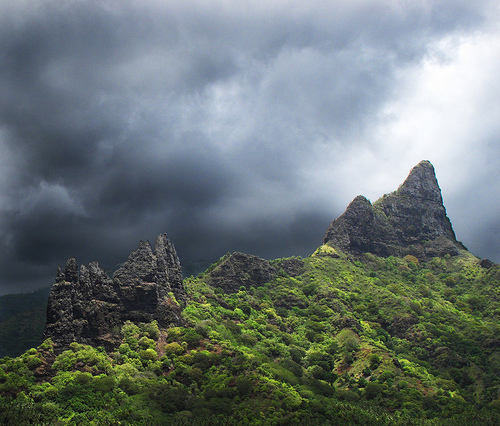
As an example, here’s one of my favorite scenes from the trip:

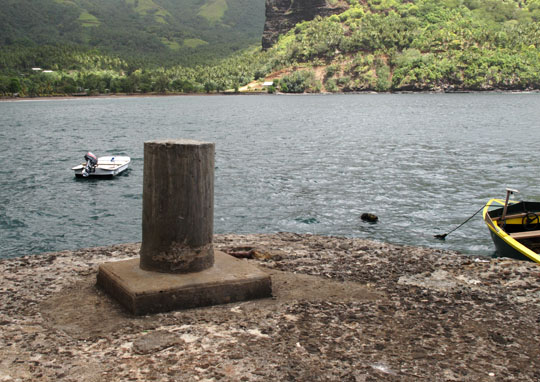
And, here’s the dock post I used to rest the camera on while taking the photo:

I still had to point the camera upwards to get the composition I wanted for the photo, but resting the bottom of the camera on this dock post helped stabilize it a lot.
Of course, you won’t always have such a sturdy tripod substitute available (especially if you’re hiking into the wilderness), but look around for rocks, tree branches, or anything else that looks like it could help stabilize your camera.
And, remember not to sacrifice a good composition for a sharp photo. It’s better to have an unsharp photo from your preferred perspective, than a sharper photo from an odd position.
What about a monopod?
Another alternative to a tripod is the monopod (which is just like a tripod, but with one leg instead of three). Although they don’t provide as much support as a tripod, they still help quite a bit. Also, sometimes monopods are allowed in places where tripods are banned.
Other ways to stabilize your camera without a tripod
For more great ways to reduce camera shake without a tripod, check out these great articles from the Digital Photography School:
If you have a point and shoot camera, you can also make a cool little tripod with a paperclip 🙂
Have you found another way to help stabilize your camera without a tripod? Please share your experience by leaving a comment below! Thanks!
Get more great tips in our free weekly newsletter.
 About the Author: Steve Berardi is a naturalist, photographer, software engineer, and founder of PhotoNaturalist. You can usually find him hiking in the beautiful mountains and deserts of southern California.

Steve – Although I haven’t tried it yet, I once read an idea for a stabilizer I’d like to share. It was pretty simple, consisting of a large washer, a length of string, and a bolt that fits the screw on the bottom of the camera. Tie one end of the string to the washer, and the end to the bolt. To use, screw the bolt into the bottom of the camera, step on the washer and pull the string taut. Obviously, the length of string needs to be adjusted for your height. When done, uncrew the bolt and wrap the string aroudn the washer.
Hmm, I don’t remember reading about this G10 in your gear guide :). The first photo is stunning. Those dark clouds make for a very moody scene.
I’ve used the washer-string-screw combination that Joe mentions, and it really does work. You just have to remember to keep tension on the string at all times. Cheap and lightweight, it fits easily into my fanny pack.
I use a “bean” bag. I made a small (about 20cm x 15 cm) bag, filled it with beans (either foam ones or as in my case brown rice, lentils – beware of water though) and use it to rest the camera on. Really useful to conform to an odd shaped perch, uneven surfaces or even on the ground. I covered mine in a water resistant fabric so I can use it on damp sand, grass etc without blowing up the rice!!!
@Joe – That sounds like a really interesting idea, I’m definitely gonna have to try it. Thanks for sharing!
@Zack – haha, I actually got the G10 after I wrote the gear guide 🙂
@loongirl – now I’m definitely gonna have to try this washer-string-bolt thing 🙂
@SSORinoco – Great idea about the bean bag! I’ve used a fleece before in a similar way, with pretty good results.
Thanks all for sharing your experience! I think I’m gonna do another post next week to share them 🙂
The same principles for holding, aiming and firing a rifle apply to using a camera. (1) hold the camera with both hands, (2) press your elbows/arms against your body, (3) position the camera to compose the scene using the optics and/or the LED display, take a deep breath and hold it as you carefully quickly shoot the scene; the only conscious movement should be your trigger finger to press the shutter button.
The bean bag also works very well when shooting from your car window. It conforms to the door sill and doesn’t tend to pivot or rock. You can also tilt it, and sometimes it can be stable enough to rest it there for a longer exposure using a shutter delay. The car can be a great blind for photographing birds & wildlife.
I use my shoulder to rest the left edge of the camera body on (Canon 40d), left hand firmly positioned under the lens (Canon 100-400) and get shots that can be blown up to 11×14 that are perfectly clear. The guy at the local camera store didn’t believe me and blew up a picture of a heron taking off to prove me wrong. He lost the bet and I got the 11×14 free!
The one thing that can be problematic with this method is landscape photography. You do have to make sure the camera is straight with the world or you will have ridiculously leaning buildings or skylines that have a leftward tilt. George’s method with a smaller lens works better in those situations.
@George – great advice, especially the elbows in part.. I always see a lot of photographers treating their SLR like a point and shoot camera
@Frank – I love that idea! Much better than having to buy one of those expensive “car tripod” things..
@kay – I’ve never heard of that (using your shoulder)! I have a real problem with getting sharp photos while handholding my 300mm (with 1.4 extender) and photographing birds, so I’m gonna try your technique. thanks for sharing!
Lots for great advice here. One thing that I do when I’m hand holding a long lens with nothing to lean on is to shoot in burst mode. I will let 3-5 shots rip as fast as the motor drive will go. Usually one of the shots in the middle of the burst is sharp.
I guess the only tip not mentioned is to keep the shutter speed at or above the focal length of your lens. So, using a 300mm lens you would want to be at 1/300 sec or higher.